Sync With Mailchimp
You’re a busy agent who loves to stay connected with your network. Reach makes it easy to send all or part of your Contacts to a Mailchimp Audience in just a few clicks.
Want to sync everyone tagged with “VIP" for your holiday party invitation? No problem—Reach keeps it simple, fast, and organized so your marketing goals stays on point.
Syncing with Mailchimp requires you to have a Mailchimp API Key. If you do not have a key or it is not stored in Reach, refer to the Get a Mailchimp API Key instructions to get your API key.
Syncing Reach Contacts with Mailchimp requires the Reach Contact to have an email address. Contacts without emails configured cannot be synced with Mailchimp.
IMPORTANT: Syncing your Contacts with Mailchimp is a process that must be manually invoked; Reach does not automatically sync your Contacts with Mailchimp. Follow the instructions below to sync your Contacts with Mailchimp.
Step 1: Select Contacts
This first step of syncing your Contacts with Mailchimp is deciding which Contacts to sync!
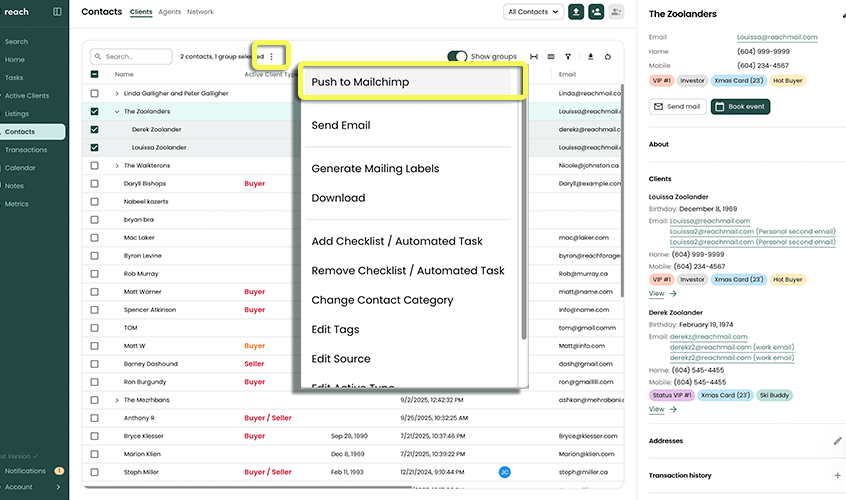
- In the sidebar, click on Contacts
- Select the Contacts that you wish to sync with Mailchimp by clicking on the checkboxes (use the search bar to quickly filter Contacts)
- Click on the Push to Mailchimp button
- Click the Continue button
Reach now reviews your selection. Reach will warn you if any of your Contacts cannot be synced with Mailchimp for the following reasons:
- If a Contact does not have an email address
- Or if a Contact shares their email address with another selected Contact (Mailchimp requires each Contact to have a unique email address)
At this point, you can continue the sync process by clicking Next (Reach will ignore the invalid Contacts), or you can click on Change Selection to refine your selected Contacts.
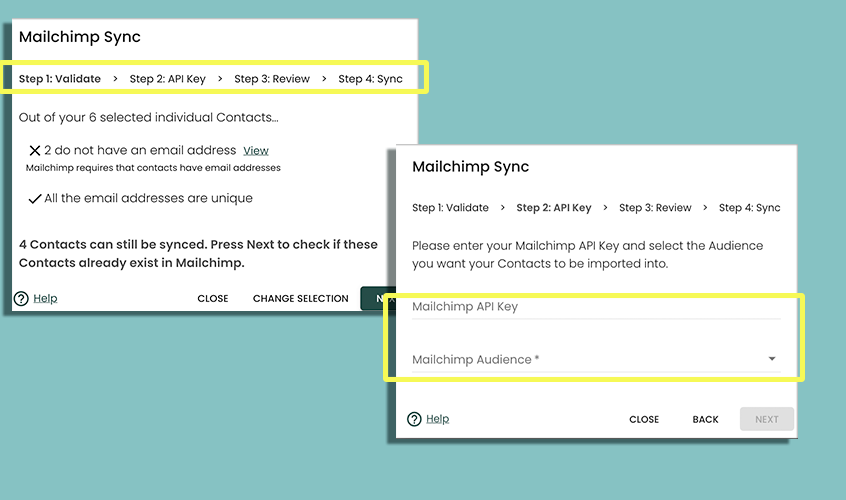
Step 2: API Key
Enter your Mailchimp API Key
- If you have stored your Mailchimp API Key in the Reach Settings, the API Key and Audience fields should be automatically selected
- Note: Your API key is securely encrypted during the sync process to ensure your data remains safe.
Select the correct destination Mailchimp Audience for your selected Contacts
Click Next
In Settings you can save the API key so that you have it enter it every time. Click Settings, then select Integrations.

Step 3: Review
The third step is for Reach to review your selected Contacts and compare them to the members you already have in your Mailchimp Audience. It does this comparison by using email addresses. Reach will not attempt to send a Reach Contact to Mailchimp if the Contact's email address is already in the Audience; Reach will only send new Contacts to Mailchimp.
Once you are happy with the Contacts that will be sent to Mailchimp, click on the Sync button.
Only a Contact's email address and name are sent to Mailchimp
Step 4: Sync
Reach will now initiate a background job to add your selected Contacts to your Mailchimp Audience. The dialog will close and a notification will appear confirming that the sync has started.
You can track the real-time progress of your sync directly within the global Jobs Panel. The Jobs Panel provides detailed success and failure dialogs, clearly indicating if any specific contacts failed to sync and the exact error returned by Mailchimp. Furthermore, if a sync encounters errors, you will receive targeted in-app push notifications and emails featuring a 'View Details' link back to the Jobs Panel.