Import Contacts
Reach lets you import Contacts — including Clients, Agents, and Network Partners — from the following sources:
CSV File: Import a
.csvfile created in a spreadsheet program such as Microsoft Excel or Google Sheets. This method tends to be a bit more tedious, but you get exact information and can deal in large quantities of data.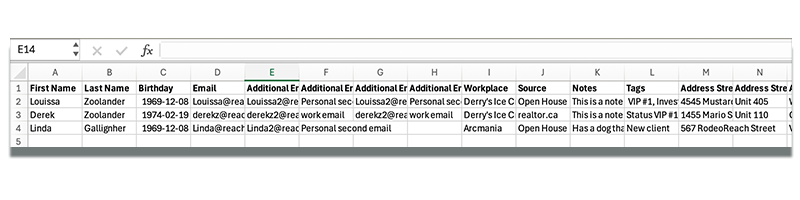
Google Contacts: Import directly from your Google Contacts. (Make sure the Google account you used to sign in to Reach has contacts associated with it.)
If working on a team, make sure to import Contacts for the correct owner. Ownership cannot change after items have been created. While an Admin user can choose who they are "Acting As" to specify the owner, an Agent user can only import Contacts for themselves.
Remember, Reach CRM is based of the Ownership of the Contact. Whoever on the team owns (imports or adds the contact) is the owner of that Contact. He/She will own the data associated to the contact, even though other team members can have visibility of it.
Importing Contacts from a CSV file
The first method of importing Contacts into Reach is via a CSV file. This is the most informative way to import contacts from other programs. Keep in mind, this process can take some time to formalize and clean up your data in the csv file. We strongly recommend spending a few days (if needed) ensuring a clean csv file with all the information you are going to need, and matching the columns as best you can to the sample csv file provided below for download.
- Some programs and other systems export to a csv file for you. These files that are produced may not exactly match with the fields we use at Reach. Some information may have to be stored in "notes" of your contact(s).
Click here to download a sample CSV file
These are the following CSV headings that are included in the CSV file. It’s important to understand how “Grouping” works with a CSV file import. For more information on Grouping prior to assembling your CSV file, Read Create A Group
Field Mapping Table
| Field Name | Description |
|---|---|
| First Name | First Name |
| Last Name | Last Name |
| Birthday | Birthday - properly formatted |
| Email address | |
| Additional Email (1) | Contact secondary email address |
| Additional Email Label (1) | Contact secondary email address label (Work, personal) |
| Additional Email (2) | Contact tertiary email address |
| Additional Email Label (2) | Contact tertiary email address label (Work, personal) |
| Workplace | Company name / employment company |
| Source | Where did client come from? A good way to track each client Source |
| Notes | This is a dedicated notes column. \* IF you have multiple note columns, notes can be linked to many columns. (ie: you have columns: 'Notes', 'Baby Names', 'Preferred Coffee' these can all be assigned to notes, in the upload function) |
| Tags | Separate with a comma (",") any tags. Tags are excellent contact identifiers ("VIP client", "Cold Active Client", etc.) |
| Address - Street Line 1 (1) | Primary address line 1 (you can put #unit and Street name/Number on this line) ie: 304-1534 Darling Street |
| Address - Street Line 2 (1) | Primary address line 2 |
| Address - City (1) | Primary address city |
| Address - Postal (1) | Primary address postal or zip |
| Address - Province (1) | Primary address province or region |
| Address - Country (1) | Primary address country |
| Address - Street Line 1 (2) | Secondary address / investment property \* Once in Reach, you can select these as "investment" |
| Address - Street Line 2 (2) | Secondary address line 2 |
| Address - City (2) | Secondary address city |
| Address - Postal (2) | Secondary address postal or zip |
| Address - Province (2) | Secondary address province or region |
| Address - Country (2) | Secondary address country |
| Address - Street Line 1 (3) | Tertiary address / investment property \* Once in Reach, you can select these as "investment" |
| Address - Street Line 2 (3) | Secondary address line 2 |
| Address - City (3) | Secondary address city |
| Address - Postal (3) | Secondary address postal or zip |
| Address - Province (3) | Secondary address province or region |
| Address - Country (3) | Secondary address country |
| Phone - Home | Home Phone number, if any |
| Phone - Mobile | Mobile - this number will be clickable in mobile app, to call direct and launch Txt message ability |
| Phone - Work | Work phone number, if any |
| Phone - Other | Any other number |
| Group Name / ID | If you have Spouses, Partners, Groups you want all in the same group, you will give them the EXACT same Group ID/Name. This will automatically put them in that group with the Group Name |
| Secondary Contact - First Name | Spouse/Partner/Affiliate First Name |
| Secondary Contact - Last Name | Spouse/Partner/Affiliate Last Name |
| Secondary Contact - Birthday | Spouse/Partner/Affiliate Birthday |
| Secondary Contact - Email | Spouse/Partner/Affiliate primary Email address |
| Secondary Contact Additional Email (1) | Spouse/Partner/Affiliate secondary Email address |
| Secondary Contact Additional Email Label (1) | Spouse/Partner/Affiliate secondary Email address label |
| Secondary Contact Additional Email (2) | Spouse/Partner/Affiliate tertiary Email address |
| Secondary Contact Additional Email Label (2) | Spouse/Partner/Affiliate tertiary Email address label |
| Secondary Contact- Phone - Home | Spouse/Partner/Affiliate home phone |
| Secondary Contact - Phone - Mobile | Spouse/Partner/Affiliate mobile phone |
| Secondary Contact - Phone - Work | Spouse/Partner/Affiliate work phone |
| Secondary Contact - Phone - Other | Spouse/Partner/Affiliate other phone |
| Secondary Contact Label | What is the "Label" of the secondary contact, in relationship to the Primary contact (ie: "Spouse" , "Husband") |
| Primary Contact Label | Reverse of above - this will apply this label, to the secondary contact (ie: "Spouse", "Wife") |
Make sure the following is true about your CSV file(s) before you continue:
Your Clients/Agents/Network Partners are in 3 separate files (i.e. not the same CSV file).
noteReach treats these 3 Contact Types as separate databases, and so they need to be uploaded separately.
The First Name/Last Name of your contacts are in 2 separate columns (e.g. First Name, Last Name)
Address information is split across 4 separate columns for street address, city, province, and postal code data (up to 3 different addresses are supported)
Phone numbers of different types are in separate columns (i.e. "home" and "work" phone numbers should not be mixed)
Any birthdays are in an unambiguous format so that they can interpreted correctly (e.g. April 8, 1990 as opposed to 4/8/90)
If you have a column for tags, that you know the delimiter of the character used to separate your tags. (For example: a comma, semicolon, or space are the most common). you can import multiple tags in the column, providing they have a delimiter.
Importing Groups / Relationships
You can group contacts (Contact #1, Contact #2…) 2 ways, during the Import process:
Create a Group with contact(s) on separate rows of your CSV file. This means that perhaps the Husband and Wife are on different rows (row 1 and row 2) in your spreadsheet.
Group a Group with 2 contacts on the same row (using "Secondary Contact" data) in the csv. file towards the last few columns of the sample CSV file above.
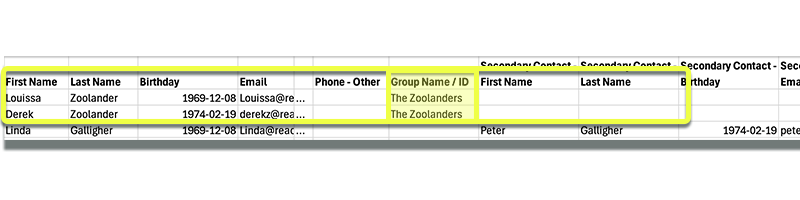
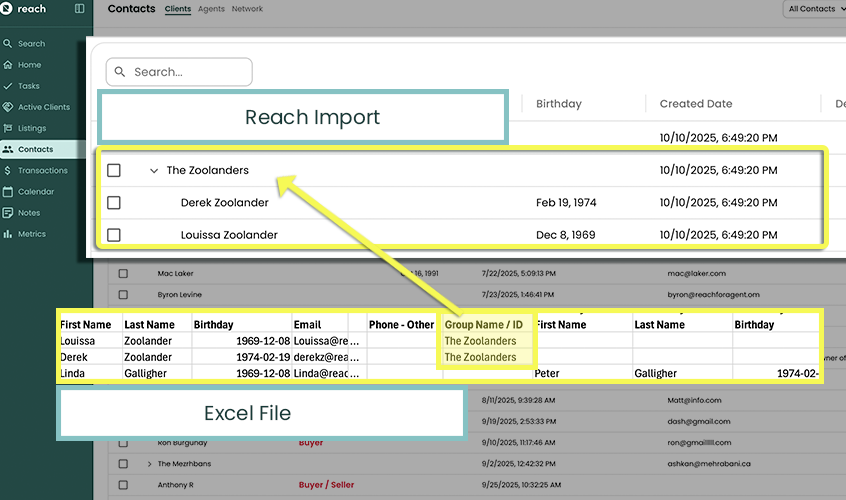
Option 1 - Creating a Group With Contacts that are on Individual Lines
- Input Contact #1 is on a single separate line.
- Make sure Contact #2 you want Grouped with Contact #1, is on a separate line
- Input the name of the group in the CSV. file heading/row called "Group Name/ID". ** You must make sure that the Group Name/ID is exactly the same for both Contacts. This will ensure that Contact #1 and Contact #2 are brought into Reach as a "Group Name/ID" (ie: The Zoolanders)
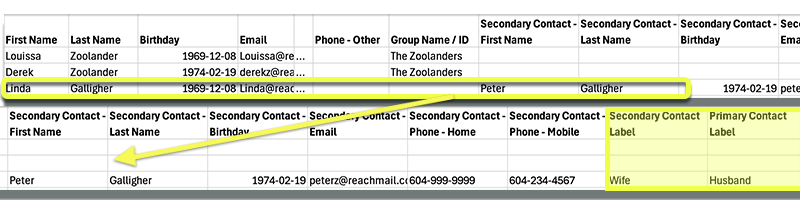
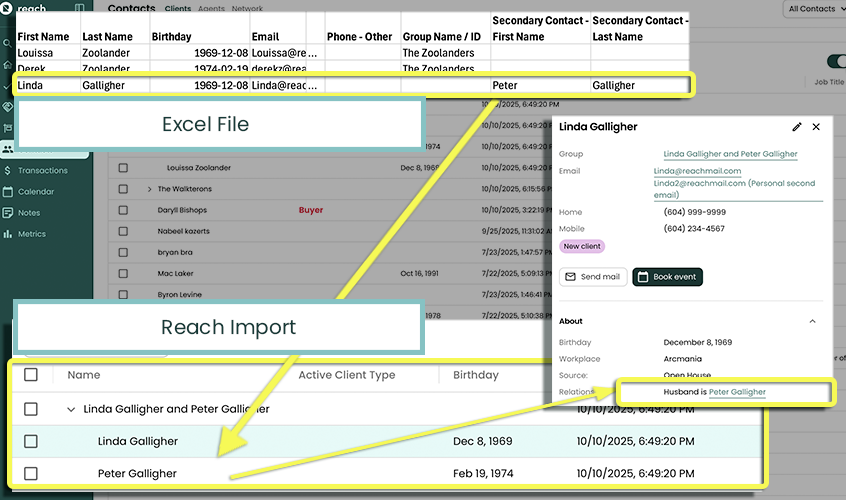
Option 2 - Creating a Group with 2 contacts on the same row.
This option allows you to create 2 contacts that are linked to the eachother via Relationship and creates a Group ID/Name corresponding to the contact(s) names you've added. This happens automatically (ie: Spouses names become the Group Name)
The row Contact will have 2 contacts (max) on it, and specify both the Group ID/Name and a Relationship Label for each contact. This way, in each Contacts profile, the opposite contact will appear with a Relationship Label, See below image for how it will display
Once you have made sure your CSV file is in a good state, let's import it into Reach!
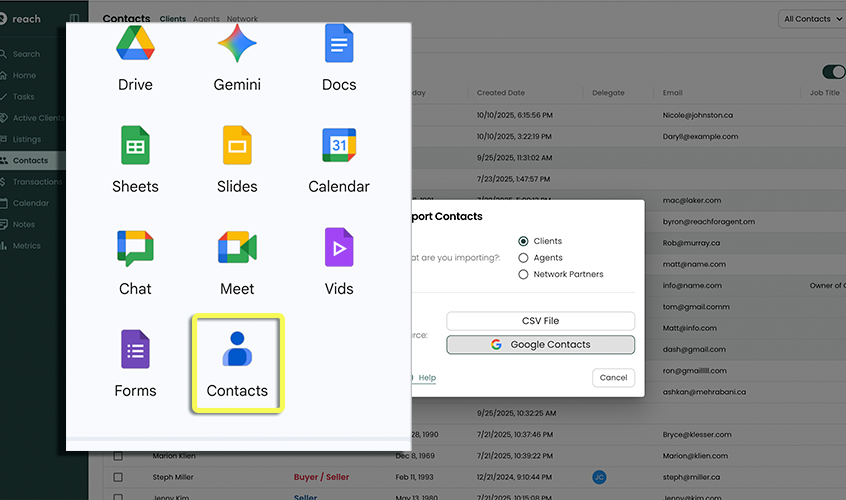
In the sidebar, click on Contacts
Click on Import
Select either Clients/Agents/Network Partners depending on what you are importing
Click on CSV File
Click on Upload File and select your file
Double check that the Summary is correct (you may need to fix your CSV file if there are warnings displayed and then re-upload the file)
Click Next
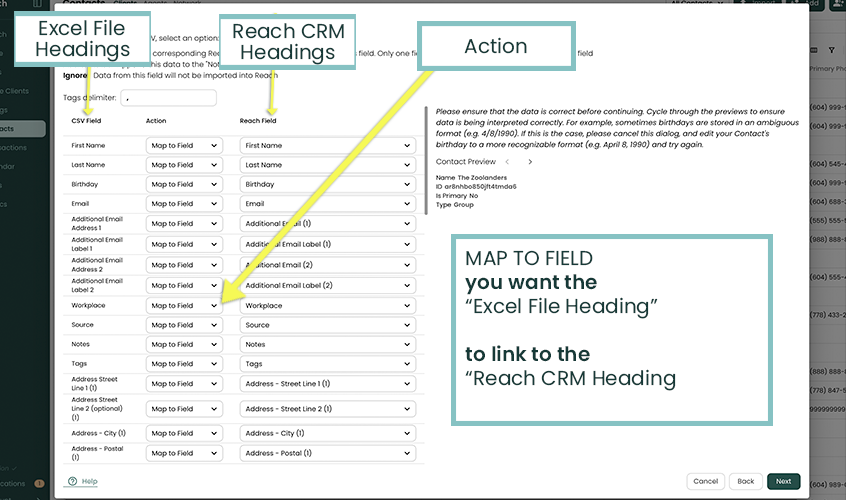
For each column in your CSV, select 1 of 3 options:
Map to Field - This option in the "Action" column, lets you take the information in your CSV file column, and MAP (or Match) it to the correct information area of Reach.
tipExample
First Name column in your CSV file will have the first names of your Clients. You will want to Map To Field (Match this) to the First Name field in Reach CRM. This way the data imports their First Name
Add to Notes - This will stick any of the contents of that column in your CSV file, into the Notes section of Reach. This is handy for any random columns of data that dont Map perfectly in Reach. Dont be affraid to have multiple columns in your CSV file mapping to notes.
or Ignore - This option omits any data importing of that particular header/column
By default, all columns will be set to Add to Notes unless there is no data in the entire column in which case it will be set to Ignore
If you have secondary contact information in the same row, two contacts will be created for each of them, and they will be placed in a group.
Once you have mapped your fields, cycle through the Contact Preview to verify that the Contact information is coming through correctly
Click on Next
Select which Contacts you wish to import. Select the checkbox in the table header to select all
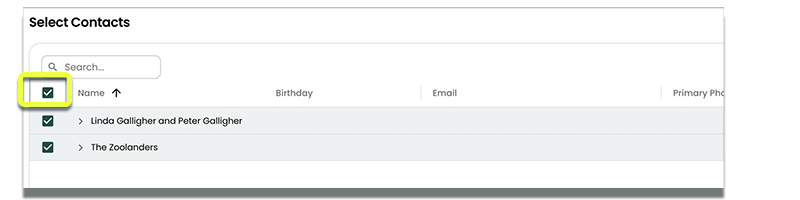
Click Import
You now have your Contacts imported and ready to be used in Reach!
Importing Contacts from Google
The second method of importing Contacts into Reach is via Google Contacts.
- In the sidebar, click on Contacts
- In the top right corner, click Import
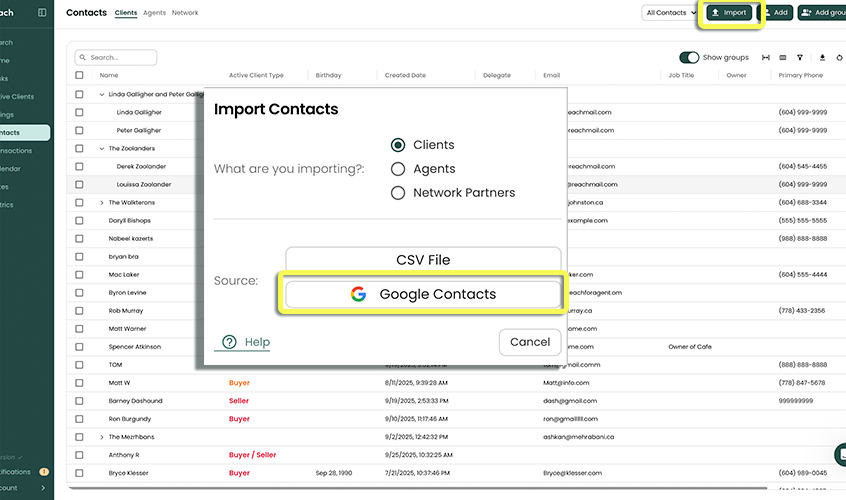
Select either Clients/Agents/Network Partners depending on the kind of Contacts you wish to import and then select Google Contacts as the source.
Click the Filter button beside the Search All Columns input box above the table.
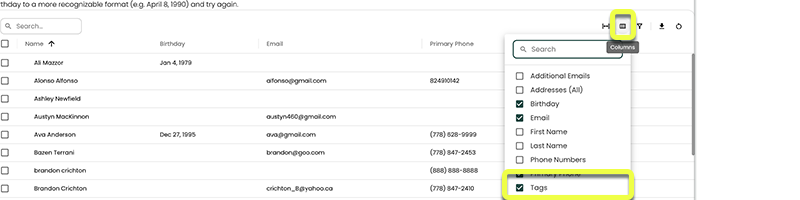
If the Tags column is not visible, click the (column selector) above and to the right of the table to select it.
Click the Tags Filter button in the Tags column.
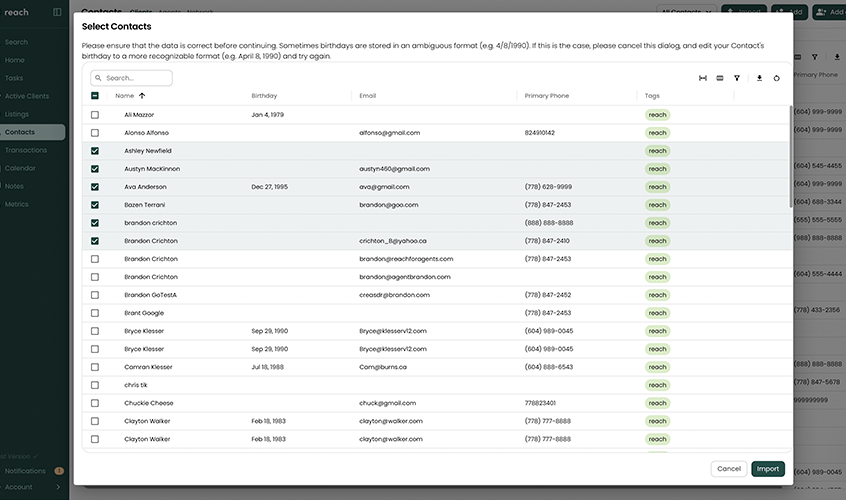
In the Included Tags, select the label you created (e.g. "Import for Reach")
Click the checkbox in the table header to select all rows and click Import.
Your Contacts have been successfully imported into Reach!