Checklists
Take your tasks and organization to the next level with Checklists. Whether you’re a tight-knit team, a solo agent, or working with an assistant, Checklists keep you consistent, accountable, and always one step ahead.
Standardize your process, digitize your to-do’s, and deliver an experience that shows clients you’re not just organized — you’re dialed in. The result? Clients who feel supported at every turn and impressed by your attention to detail.
We’ve loaded a few ready-made Checklists into your system to get you started. Or, roll up your sleeves and map out your own custom workflows tailored to the way you work best.
Intro to Checklists
What makes checklists powerful?
A Checklist is a pre-defined set of Tasks that you can easily create all at once. They can be launched manually or be automated to 'trigger' based on a set of criteria within Reach. When launching manually, this allows users to launch a Checklist when doing other tasks in Reach like:
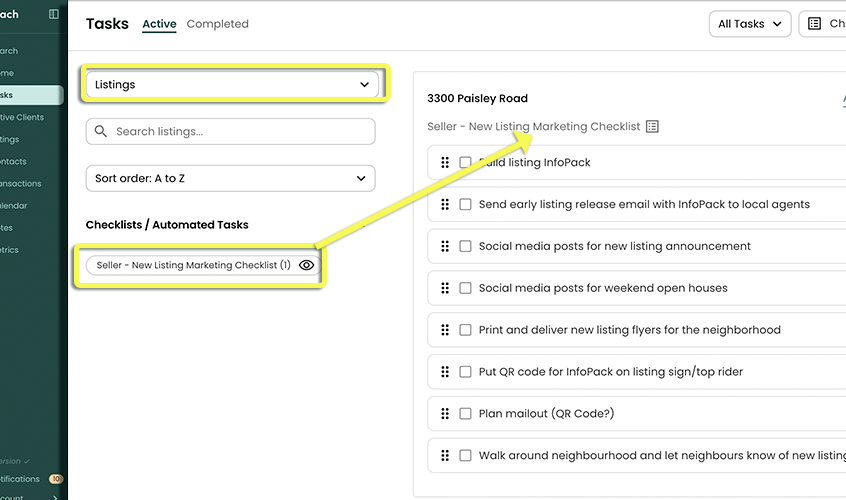
- Creating a new Listing: Use the "Add Checklist" section to attach a Checklist manually to your new Listing.
- Adding a new Active Client: Use the "Add Checklist" to launch a pre-defined set of to-do’s manually for a new client so you don't forget about them.
- Receiving an accepted offer: Congrats! "Add Checklist" to create your Transaction Tasks manually .
We will discuss adding Automation to a checklist, below:
Creating a Checklist
Pre-Made Checklists
Pre-made Checklists are made by our team at Reach and ready for you to start on the right foot and available to you immediately. All you need to do is the following:
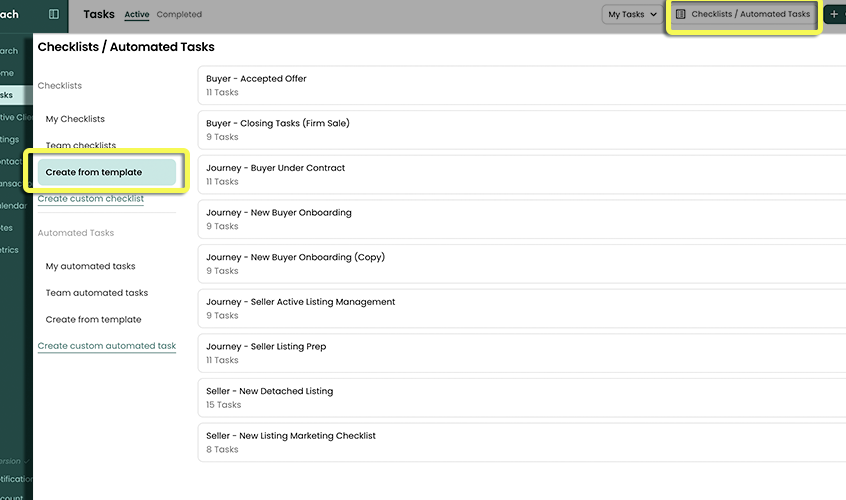
In the sidebar, click on Tasks
Click Checklists/Automated Tasks in the right corner
Under Checklists in the left side menu, Select Create from template
Here you will find the list of Reach-made Checklists.
tip🚀 You will see we have built some called "Journey" and that means they have an automated email template associated to them. This means that there is a a related due date such as a Subject Date, A List Date, A Client Created Date, or others that will create a task with an email. The task will give you the ability to Preview and Send.
Select the Pre-made Checklist you would like to begin using.
Optionally, make any changes to any of the Tasks (eg. Add/Remove/Edit)
Click Save
The Checklist will now appear in the area called My Checklists in the left side menu. Now it is ready to use!
Custom Checklist
Prefer your own style? Build personalized Checklists from the ground up, adding as many tasks as you need. This is where Reach steps in to manage your daily workload — helping you stay focused, consistent, and looking your best in front of clients.
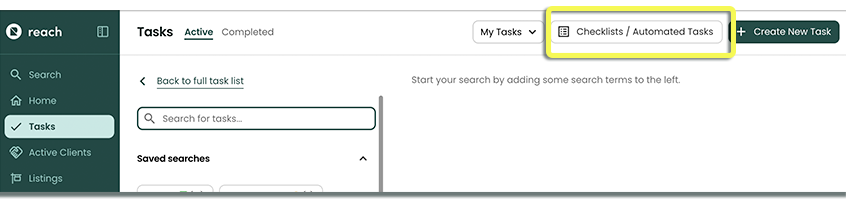
In the sidebar, click on Tasks
Click Checklists/Automated Tasks in the top right corner
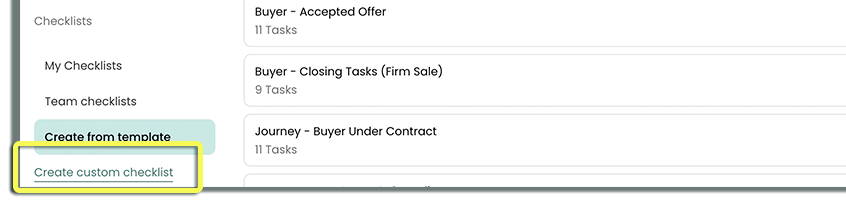
Under Checklists in the left side menu, select Create Custom Checklist
A dialogue box now appears like below:
\
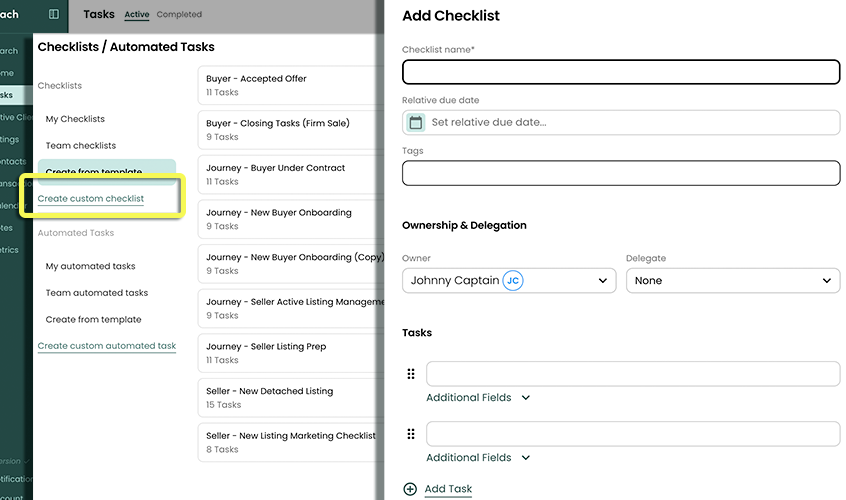
Specify a Checklist Name
Optionally add a default Relative Due Date for all the Checklist Tasks.
- (Refer to the Relative Due Date Types table for more information)
Optionally set any default Tags for all the Checklist Tasks.
- By default the Relative Due Date type (ie "Client Created Date") is added as a tag but this can be removed if not desired. Tags help with searching for Tasks (read about Saved Searches for more information)
Optionally Assign a Delegate as the default delegate for all the Checklist Tasks.
- (Refer to Delegate An Item for more information on delegation)
Optionally set any default Repeat (Repetition) settings for all the Checklist Tasks.
- (Refer to the Repeat Tasks for more information)
Optionally set any default Reminders settings for all the Checklist Tasks.
noteTo set a default Reminder for the entire checklist, the checklist must first have a Due Date.
Add Tasks to the Checklist.
All Tasks that you add will inherit the default Delegate, Relative Due Date, Repeat settings, Reminders, and Tags from the whole checklist above, but can be individually edited.
You must have at least two Tasks in a Checklist.
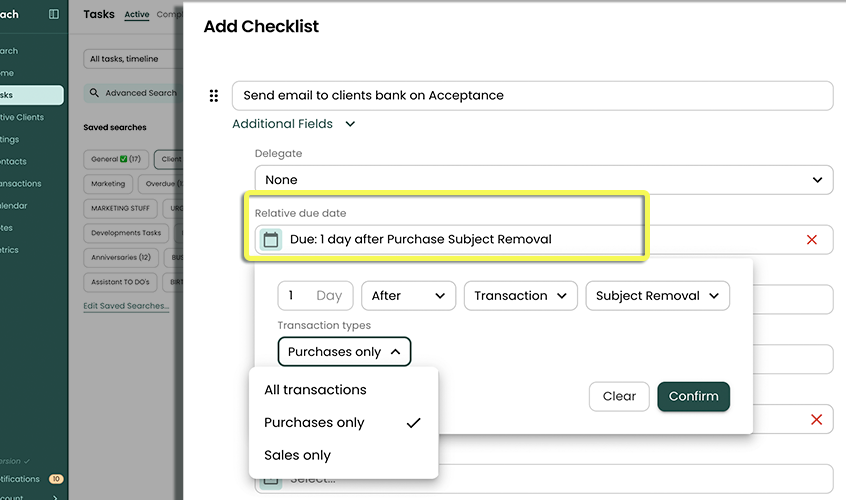
When adding a Task to a checklist, you can select "Additional Fields" for more options for that specific task, within the checklist:
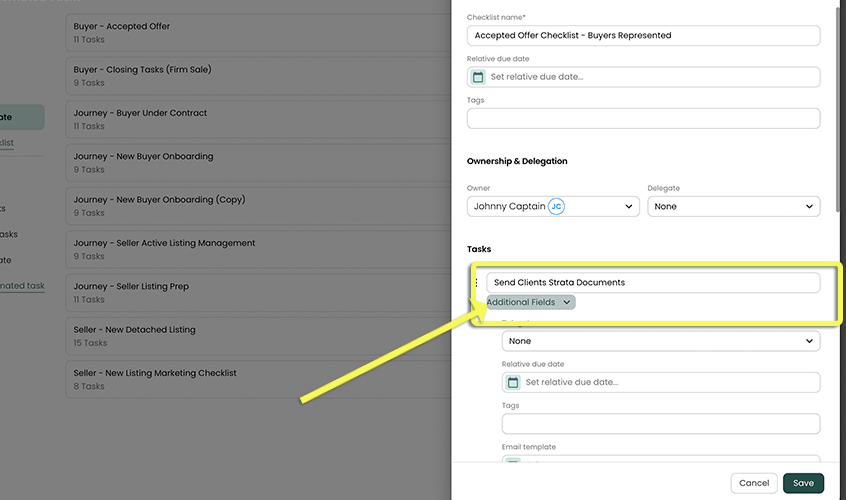
Delegate this specific task, within the checklist, to a team member.
Set a Relative Due Date for this specific task, within the checklist.
Set Repetition of the task, if you want the specific task to repeat more than 1 time.
noteThis will only cause the specific task, within the checklist, to repeat
Set a Reminder for the specific task, within the checklist.
Create a Tag, to help keep the task organized. Note, Reach automatically assigns a Tag if the task has a Relative Due Date
Link an Email Template to the task so Reach will prompt you to "Preview and Send" when the task is due.

(Refer to Email Templates and Checklist Journey for more information)
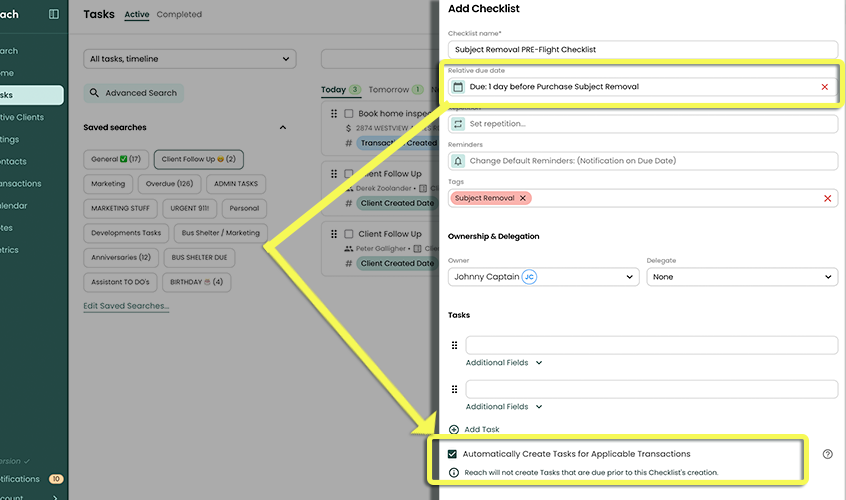
Optional, set the checklist to Automatically Create Tasks For Applicable X. This will approve the checklist to be automatically created for all transactions, based on the relative due date you set
Note: You must have selected a relative due date (Due X days before/after item)
Click Save
A Checklist will not automatically create Tasks that are due prior to the creation of the Checklist itself. For example, a Checklist that creates a Task due "1 week after Client Created Date" will not create any Tasks for Clients that were added to Reach more than 1 week ago.
Copy a Team Members Checklist
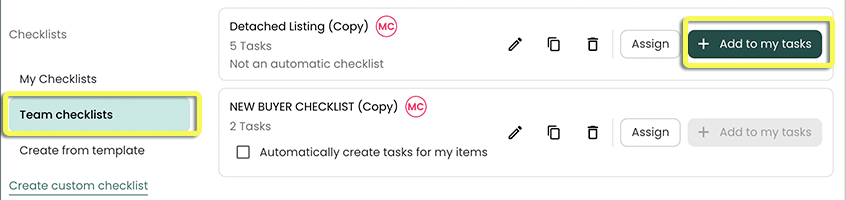
If you are on a Team in Reach, you may notice a section called "Team’s Checklists" in the left sidebar of Checklists. This option allows you to copy a Team Member's Checklists and make it your own (providing they have granted permission access for you to View their Checklists)
Here are the steps to copy a Checklist:
In the sidebar, click on Tasks
Click Checklists/Automated Tasks in the right corner
Under Checklists on the left
Select Team Checklists
Find the Team Member's Checklist you wish to copy and use.
Click the "+ Add to my tasks"
Using Your Own Checklists
If you have your own Checklists that are set up to Automatically create Tasks, then there's not much more you need to do! Your Tasks are being created for you and can be viewed on the Tasks page. If "Automically Create Tasks" is not turned on, you now need to launch your Checklists manually, and this can be done at certain areas within reach:
Launching From The Checklist Dialog
You can launch a non-automatic Checklist from the Checklist dialog.
In the sidebar, click on Tasks
Click on Checklists / Automated Tasks in the top right corner
Select My Checklists in the left menu
You can Assign Checklists to a certain Client, Listing, or Transaction, or you can Add the Checklist's Tasks directly (only applicable for Checklists not required to be linked to an item)
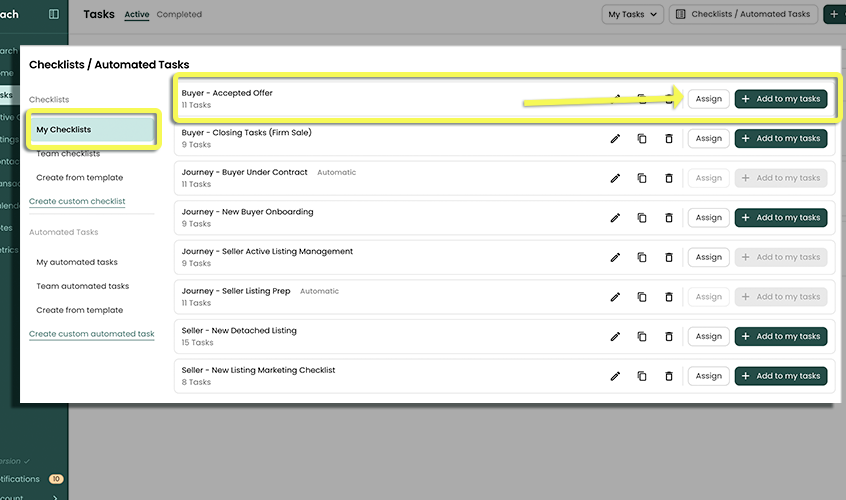
(If 'Assign' Clicked) In the dialog that appears, select the Tasks in the Checklist you wish to add.
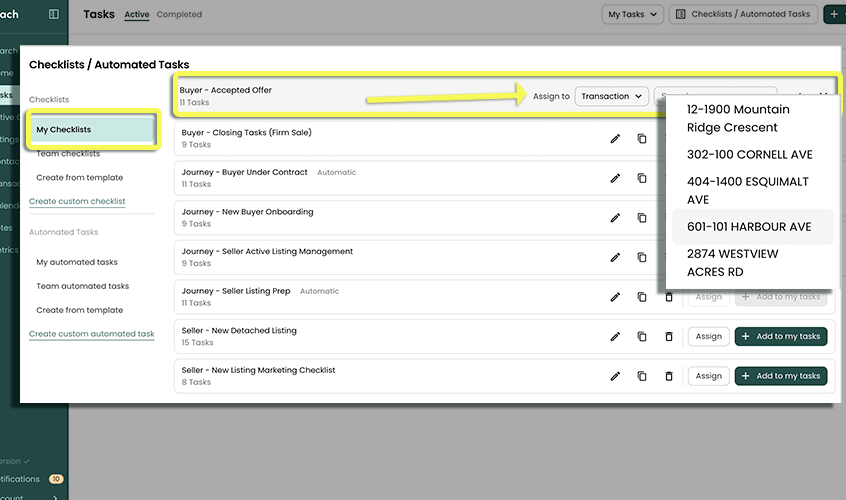
(If 'Assign' Clicked) Click ✅ to confirm the selection, then select ALL (or partial) with the dialogue box, then click Assign
OR
- (if 'Add to my tasks' Clicked) Confirm the creation of Tasks by clicking OK
Launching From a Client / Listing / Transaction
You can launch a non-automatic Checklist from within the details of a Client, Listing, or Transaction.
In the sidebar, go to Contacts, Listings, or Transactions
Click on the item in the table to open its details on the right
Scroll down to the Activity section, and select Tasks (header on the Activity)
Click on Add Checklist
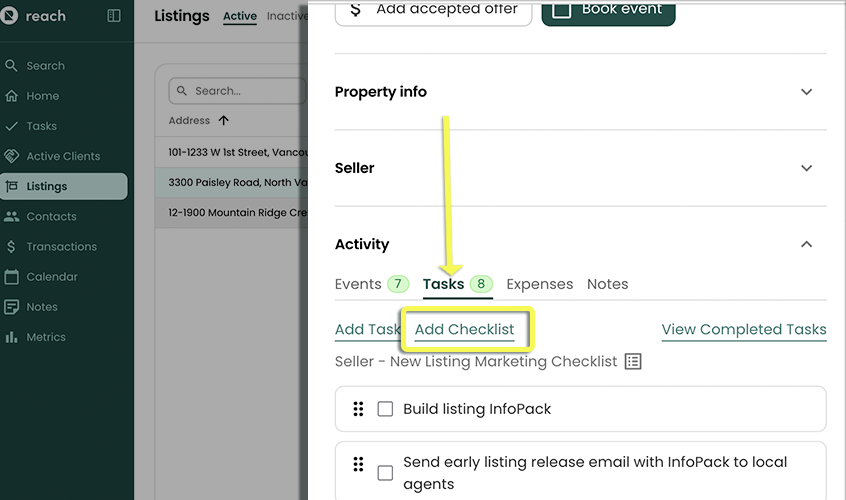
In the dialog that appears, select the Checklist(s) that you want to add to the item
cautionNote that Automated Tasks and Automatic Checklists are selected by default
After making your selection, click Select
Using a Team Member's Checklists
If someone one your team has given you permission to view their Task Checklists , then you can use them for your items! Using a non-automatic (manual launch) Checklist is exactly the same as the process described above in Using Your Own Checklists
However, using a team member's automatic Checklist is more nuanced:
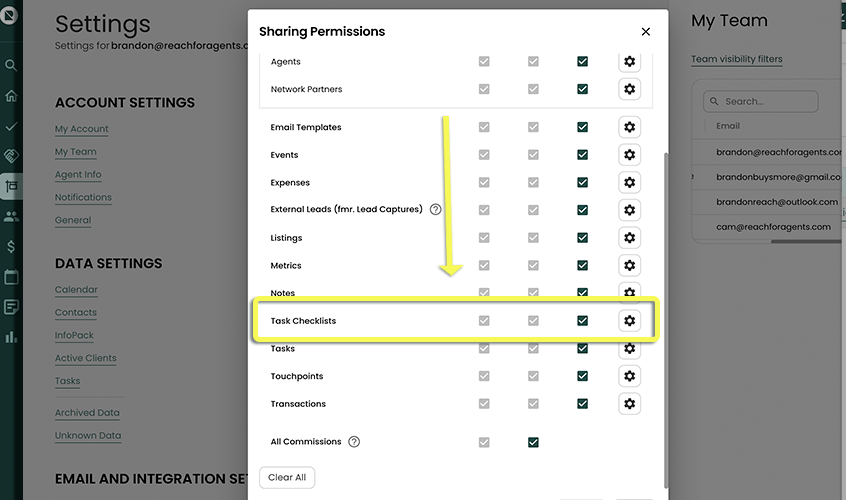
- (Refer to the Sharing Permissions for more information on Team Permissions to make sure you, or your team member, has shared the checklists with you)
You can choose to Use, Copy, Edit or Delete a Team Member's checklist, if you have been given permission.
Using a Team Member's Automatic Checklist
By default, your team member's Checklists that are set to automatically create for them, will not automatically create Tasks for your items as this could create hundreds of Tasks unbeknownst to you, at the time of creation.
We make sure that each user is aware of what they are creating, before we have hundreds of future tasks automatically create for you :)
In order to use a team member's Checklist to automatically create Tasks:
In the sidebar, click on Tasks
Click on Checklists / Automated Tasks in the top right corner
Select My Team's Checklists in the left menu
Check the Automatically Create Tasks For My Items checkbox on your team member's automatic Automated Task.
** Now the Checklist is being used to automatically create Tasks for you.
Also, any changes made to the Checklist by you or your team member will affect both of your Tasks.
Copy a Team Member's Checklist
From the Team's Checklist area, you can USE Team Member checklists, or you can select
Edit - this will edit the team member's checklist, and effect anyone else that is using the checklist. This option is only available, if you have been given permission.
Copy - this will allow you to copy the checklist to your own checklists, and you can modify and add to it, without effecting the team member's checklist (as it is now yours!)
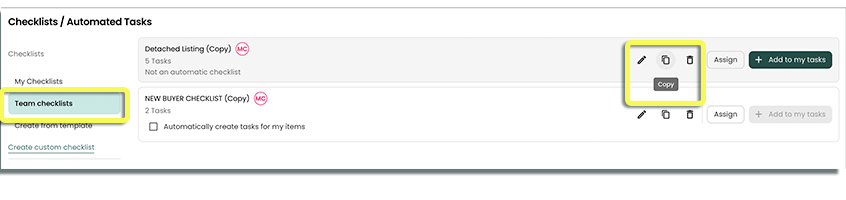
Delete - Deleting this will delete your team member's checklist, if you have been given the permission to fully edit Checklists.