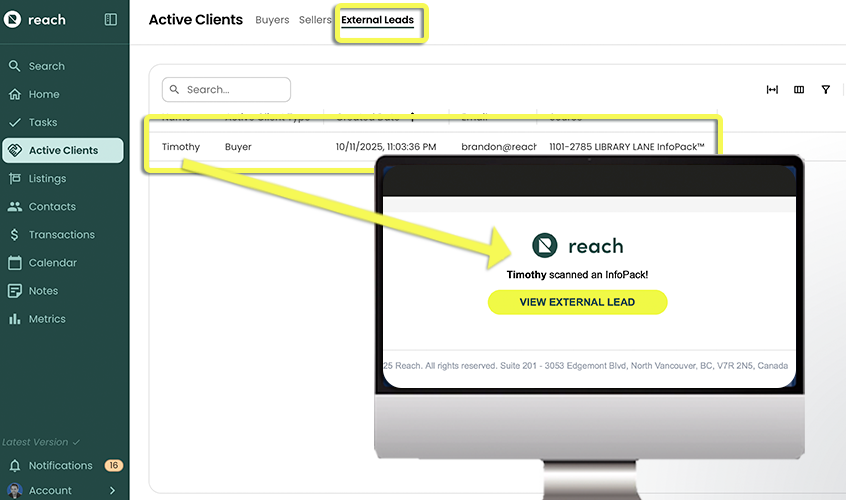
External Leads Settings
Your existing leads — for example, from Facebook Ads, your website contact form, or other sources — can be inserted directly into Reach. This means when you receive a request, or inbound lead magnet, Reach can pull that info into an area of Active Clients >> External Leads and this acts as a staging area for all your inbound leads. From this stage, you would select each Lead and decide if you convert them to your contact database, or archive them.\

Reach provides several External Leads options to support different use cases:
1. Simple Setup (Email Redirect)
You’ll receive a personal Reach Lead Email Address.
Any leads sent to this email are automatically captured and added to your Reach account.
2. Advanced Setup (Integrations & Custom Options)
Website Form Embed: Add a Reach form directly to your website to capture leads in real time.
Zapier Integration: Connect Reach to your existing tools and CRMs without writing code.
Custom API: For full flexibility, you can send lead data directly to Reach using a custom API integration. ** Advanced users and fully custom solutions.
Simple Setup (Email Redirect)
Active Client capture is simplest when you receive an email from an external system regarding a new Active Client. For example, you may receive emails from realtor.ca or even your personal website.
🚀 All emails sent to your Reach Lead email address will automatically be forwarded to the email address you use for login - so you always retain a copy of your Active Client emails
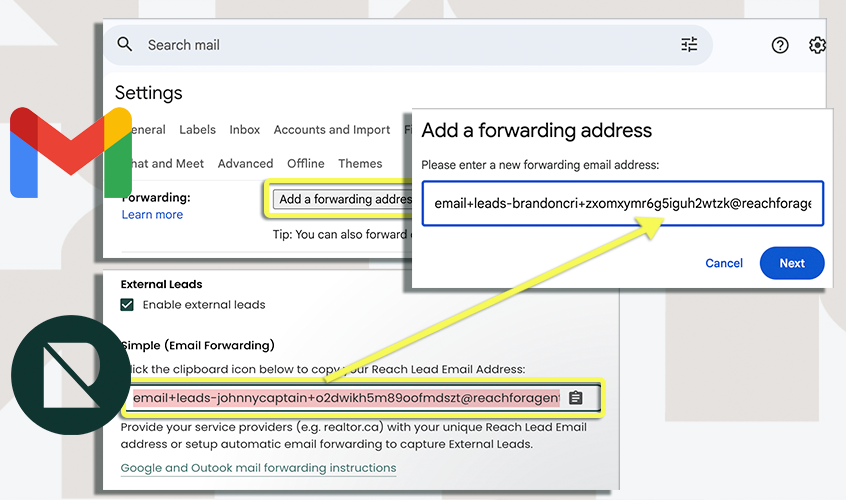
Once External Lead is enabled, you’ll be assigned a unique @reachforagents.com lead email address for capturing Active Clients. This address is exclusive to your account**, even if you are part of a team.
You can provide this email address to your service providers (e.g., realtor.ca) and request that they send or CC Active Client emails to it (emails from leads, prospects, etc. that will become "active clients for you"). Any messages received at this address will automatically create or update Active Clients in Reach, streamlining your lead capture process.
🚀 Often you can go to settings within these lead sources, like realtor.com, facebook and other sources and control what contact email address they use, and paste/replace your unique "reach" address there
Any Leads sent to this email will automatically appear in your External Leads section in Reach (Active Clients -> External Leads).
If you are unable to provide your service provider with your Reach Lead email address, then you can setup email forwarding (see instructions below) so that any Active Client emails that get sent to your email can be automatically forwarded to Reach. This method tends to create 2 emails, for each forward (1 from the inbound, 1 from the forward to your email address).
Manually forwarding emails to your Reach Lead email address may not work as the original email is often required to parse the relevant Active Client information.
Enable External Lead Capturing
- In the Sidebar, click on Account, then Settings, Then
- Click on Active Clients
- Select the Enable External Leads checkbox to enable Active Client Capturing
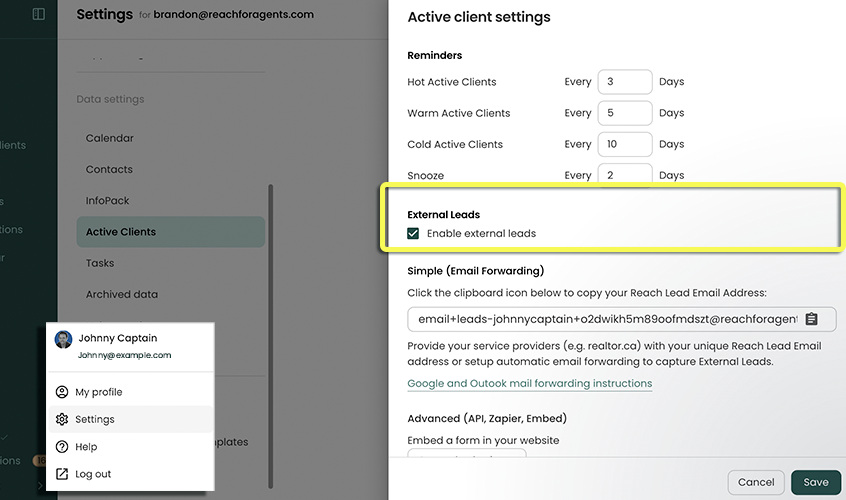
Use Your Reach Lead Email Address
If your service providers cannot send Active Client emails directly to your unique ****@reachforagents.com address, you can configure your email provider to automatically forward these messages to your Reach Lead email.
Automatic forwarding is important because manually forwarding emails may not work. Reach often requires the original email headers and content to accurately parse and create the relevant Active Client information.
Setup Google Mail Auto-Forwarding
Follow the steps below to setup email forwarding for Google Mail or refer to Google's Documentation
- Login to Google Mail in a web browser
- In the top right, click the gear icon to open up "Quick Settings"
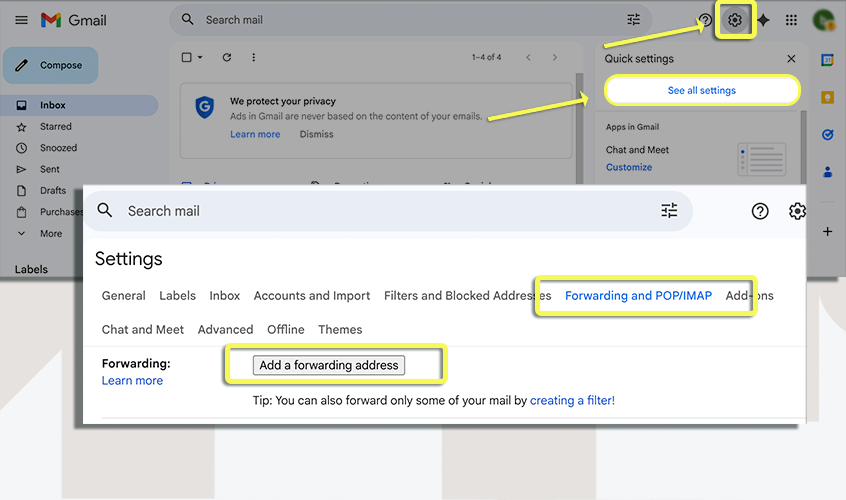
- Click the "Select all Settings" button at the top
- In the top tabs, select "Forwarding and POP/IMAP"
If you have already added your Reach Email Address and you are setting up an additional filter, skip to step 10
Click the "Add a forwarding address" button
Enter your unique Reach email address (found in Settings -> Active Client Settings) and click Next
Click "Proceed" and then "OK"
Wait for Reach to forward you the verification code email
Once you have your verification code, reopen the "Forwarding and POP/IMAP" settings, put the verification code in and click the "Verify" button. ** There is a chance that google does not to send you a verification code. If you get a "confirmation email" from google then it may be completed already. move to next step
In the top tabs, now go to "Filters and Blocked Addresses"
Click the "Create a new filter" button
Create a filter using the "From" and/or "Subject" and other fields to create a filter that matches an Active Client email from a service provider.
tip🚀 For example
The "From" value of "mailto:lead@realtor.ca" captures new leads from realtor.ca (This is just an example, please make sure to check your sources. These emails can change from time to time depending on the source).
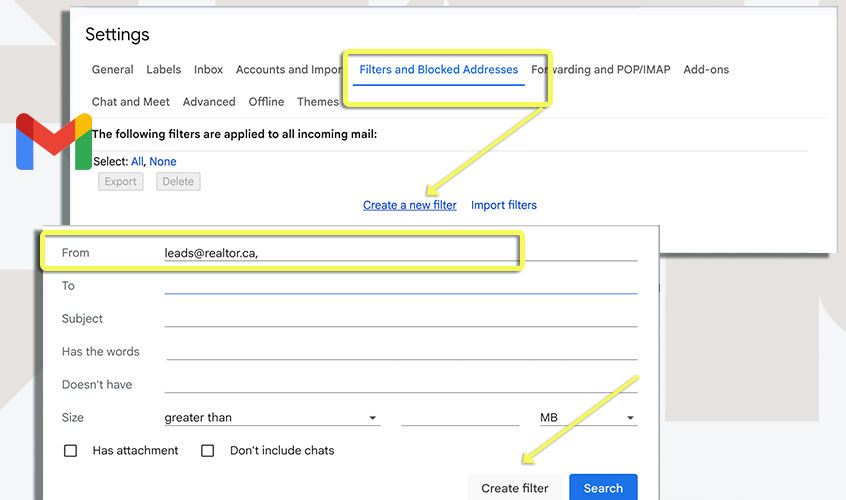
Click the "Create filter" button
In the next screen that prompts for the desired action, select "Forward it to" and select your Reach Lead email address. ** If no email address appears here, you need to refresh your browser and re-check.
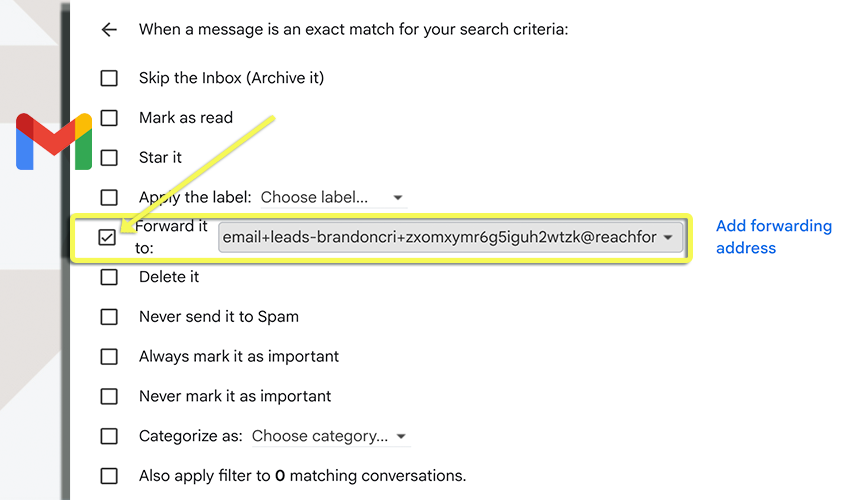
Optionally select the "Skip the Inbox (Archive it)" option as Reach will forward you a copy of the original copy anyway
Click the "Create Filter" button to create the filter
Lots of work to set this up, but once its up and running, its simple. Please note, Reach does not control external sources and what email addresses they use to send you Lead Requests. We have seen occasionally that external sources have changed their "sending email address" and that has broken the connection for some users (until they were able to update the new address in google.)
Setup Microsoft Outlook Auto-Forwarding
Follow the steps below to setup email forwarding for Microsoft 365.
- Login to Microsoft Outlook in a web browser
- In the top left, click the "View" tab
- Click the "View Settings" button underneath
- In the sidebar, select the "Mail" item
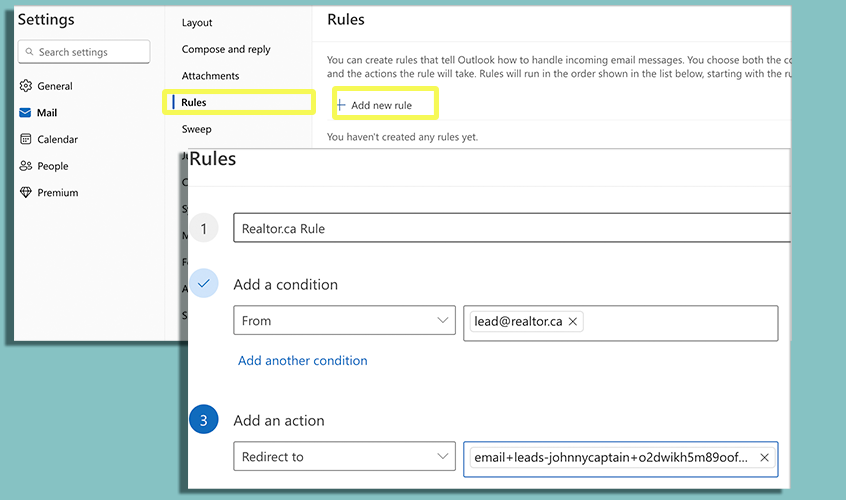
- In the following menu, select "Rules"
- Click "Add new rule"
- Name your rule (e.g. "Reach realtor.ca External Lead")
- Using the conditions, create a filter that matches an Active Client email from a service provider. For example, the "From" value of "mailto:lead@realtor.ca" will match new Active Client emails from realtor.ca
- Select "Add an action" and select "Redirect to" from the dropdown list.
- Enter your Reach CRM Active Client Email Address (your unique @reachforagents email address found in Settings -> Active Client)
- Click Save to finish
Repeat for as many service providers as applicable. At this point, it would be good to go to your service provider's website (or realtor.ca, etc) and send yourself a test Active Client to verify the forwarding setup has been configured correctly.
Advanced Lead Capture
Private / Public Key
If you need to get your Public or Private Key:
- In the Sidebar, click on Settings
- Click on Integrations
- Click on Show Public Key or Show Private Key (whichever is needed)
- If there is no key, click on the applicable Generate Key button to generate a new key.
- Click on the clipboard icon to copy the key.
- If you generated a new key in step 4, make sure to Save the Integration Settings form.
- Use your key as specified in the integration steps below.
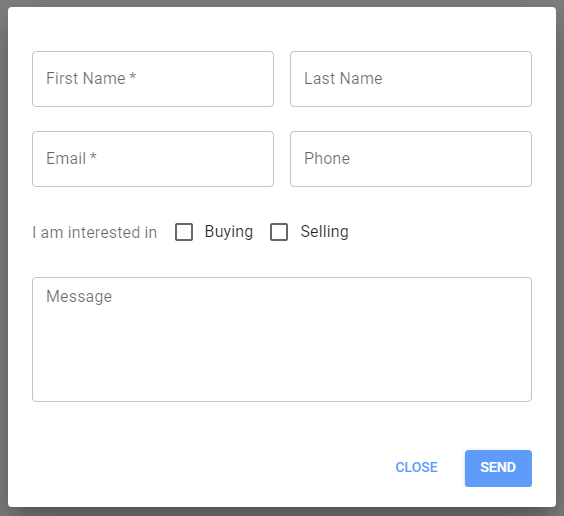
Embed a Reach Form
Reach provides a simple form that you can embed in your existing site. This will appear as a "Get In Touch" button that when clicked opens a popup form.
- In the Sidebar, click Settings
- Click on Active Clients
- Make sure Enable External Leads is selected
- Click on Get Embed Snippet
- Copy the embed snippet
- Place the snippet in your website (or provide the snippet to your website service provider for them to insert)
- Test the form in your website
You should now be able to see your External Leads come in! Simply visit Active Clients -> External Leads to see any new External Leads.
Script Technical Details
The script will insert the "Get In Touch" button inside the element that has the id reach-button-container. This element is provided in the snippet but is not necessary if an element with that id already exists on the page. The script can also use an existing button with the id reach-button instead of adding a new button to the page (in which case the reach-button-container element is not necessary).
Integrate using Zapier
Zapier is a service that allows integration between different applications. Reach has written a External Lead Zapier integration that you can use.
Our integration is not yet publicly available. Use the following link to get access to our integration: https://zapier.com/developer/public-invite/154120/3e9ac52454a93a71bbdc7971cc72a357
- Create a Zapier account https:
- Navigate to the invitation link above
- Click on Accept Invite & Build a Zap
- Once redirected to the Zaps page, click on Create Zap

- Configure your trigger (e.g. Facebook Ad) and follow the prompts and Zapier help guide
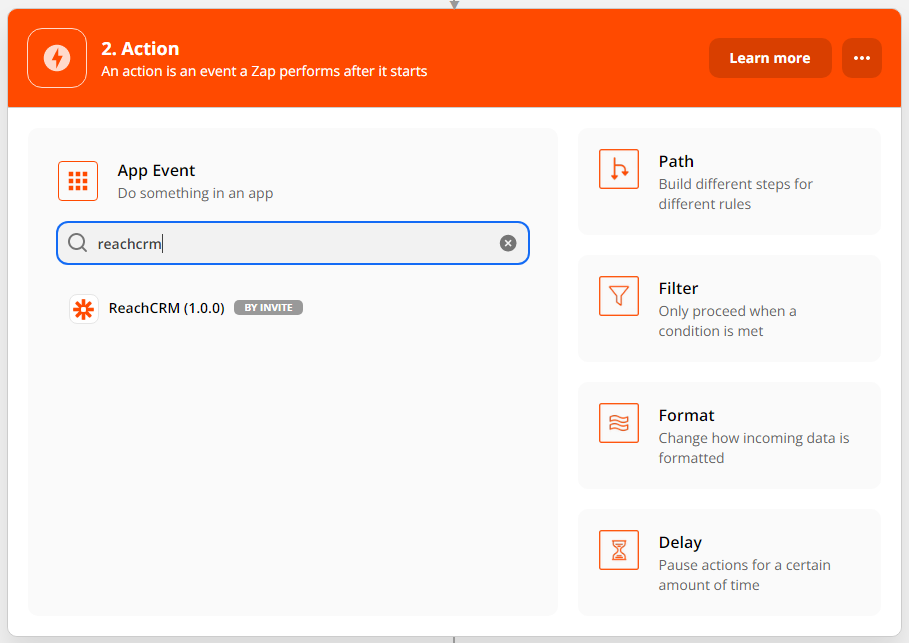
- When configuring your action, search for ReachCRM
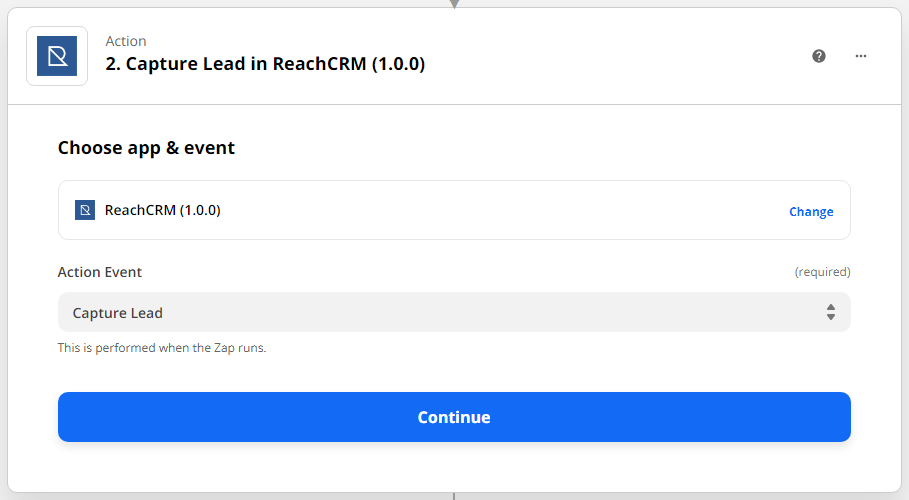
- In the Action Event dropdown, select Capture Active Client and click Continue
- In the Choose Account dropdown, select Connect a New Account
- The pop that appears will ask for your Private API Key.
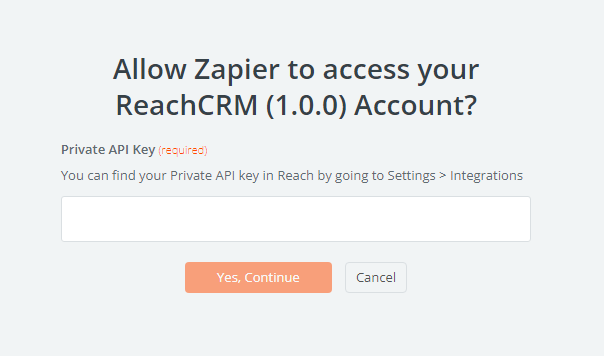
- In Reach, go to Settings > Integrations and click on Show Private Key. Once shown, click on the clipboard icon to copy the key. If there is no key, click on Generate Private Key. If generating a new Private Key, make sure to click Save on the Integrations page.

- Put the private key in the popup window and click Yes, Continue
- Once the popup closes, click on Continue in the Zap
- Click on the Reach fields to map them to values from your configured Action. The expected Reach fields are the following:
- First Name (required)
- Last Name
- Email (required)
- Phone Number
- Message
- Is Buyer
- Is Seller
- Source (required)
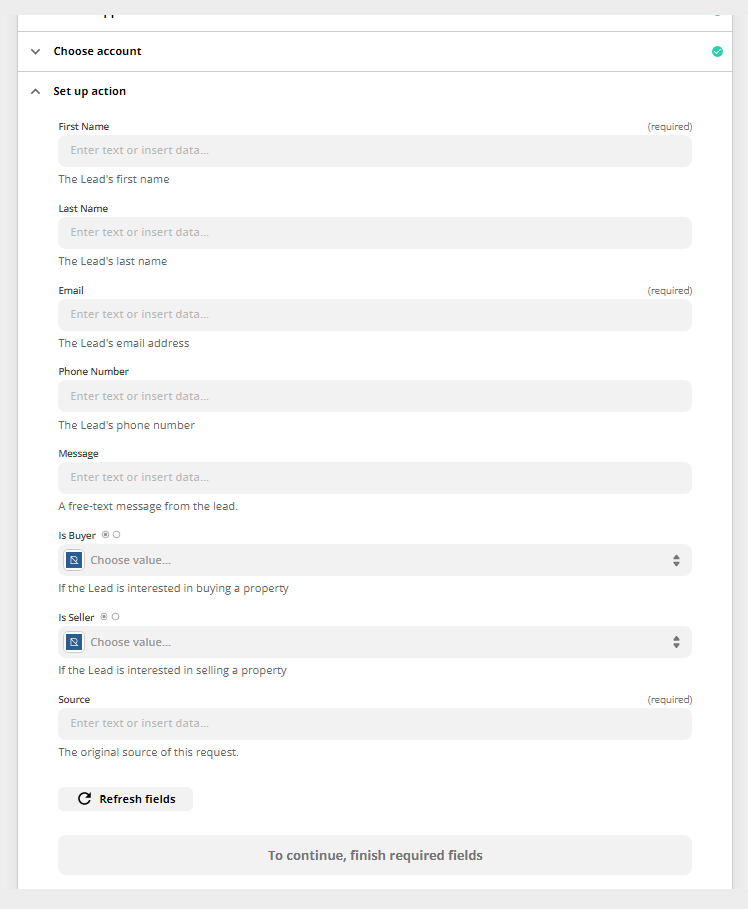
- You can either map values from your Action or type hard-coded values. For example, if you type "Facebook Ad" as the Source, then every External Lead's Source will be "Facebook Ad".
- Once complete, click Continue
- Test your integration
- Turn on your Zap!
API Integration
Reach offers a public API endpoint that new External Leads can be sent to. This can be useful if you control a backend service and want to send new External Leads to Reach or you have an existing form on your website that you want to use instead of the provided Reach form.
Technical Details
Send a POST to with a JSON payload that adheres to the following JSON schema:
schema: {
  type: 'object',
  properties: {
    firstName: {
      type: "string"
    },
    lastName: {
      type: "string"
    },
    phoneNumber: {
      type: "string"
    },
    email: {
      type: "string"
    },
    isBuyer: {
      type: "boolean"
    },
    isSeller: {
      type: "boolean"
    },
    source: {
      type: "string"
    },
    message: {
      type: "string"
    },
    publicKey: {
      type: "string"
    }
  },
  required: ["firstName", "email", "source", "publicKey"]
}
API Example
The following snippet is example code that is run when a user clicks the submit button on a webform
const form = document.getElementById("contact-form");
const name = form.querySelector('[id="name"]').value;
const email = form.querySelector('[id="email"]').value;
const phoneNumber = form.querySelector('[id="phone"]').value;
const message = form.querySelector('[id="message"]').value.trim();

const payload = {
  firstName: name,
  email,
  phoneNumber,
  source: window.location.href,
  message,
  publicKey: YOUR_PUBLIC_KEY,
};

fetch("https://reachforagents.com/api/captureLead", {
  method: "POST",
  mode: "no-cors",
  headers: { "Content-type": "application/json; charset=UTF-8" },
  body: JSON.stringify(payload),
});