What The Seller Experiences
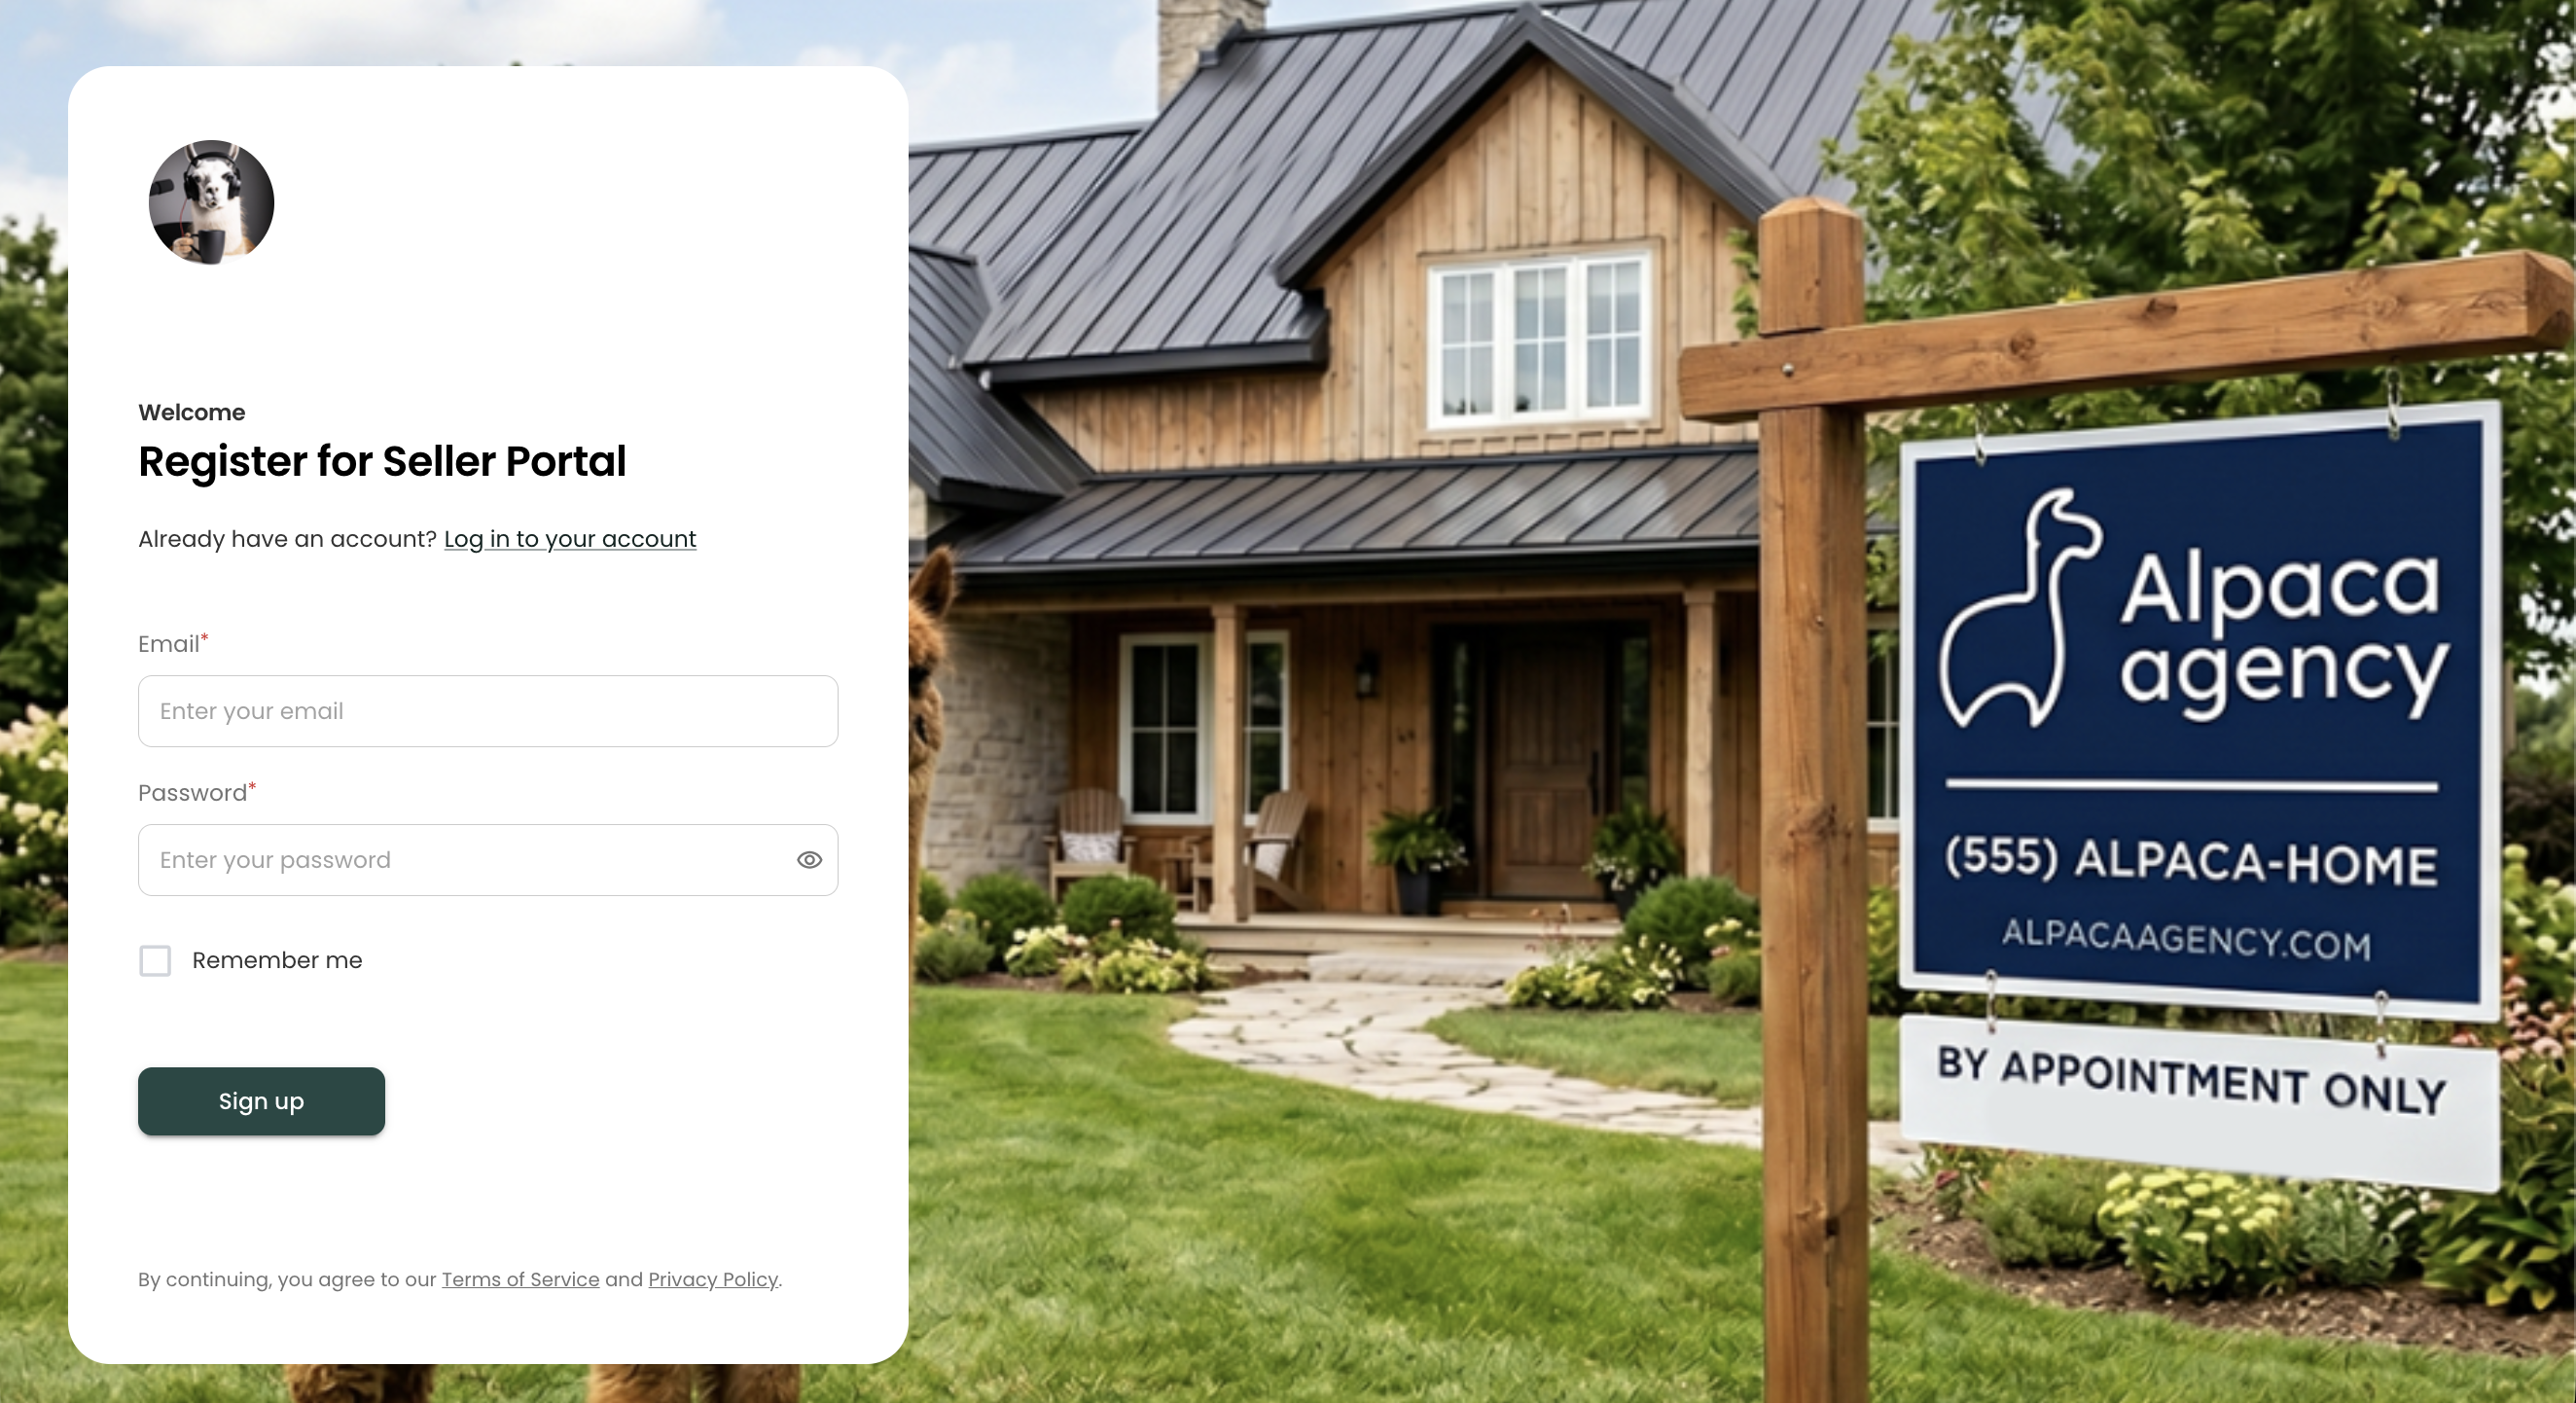
Once the seller clicks the invitation link, they go through a short setup (A wizard will guide them through this process easily), but first they land on your customized registration screen.
Don't forget to setup this landing page. See Portal Settings for this setup.
Seller Registration and Sign In
Create an account — Name, email address, and password.
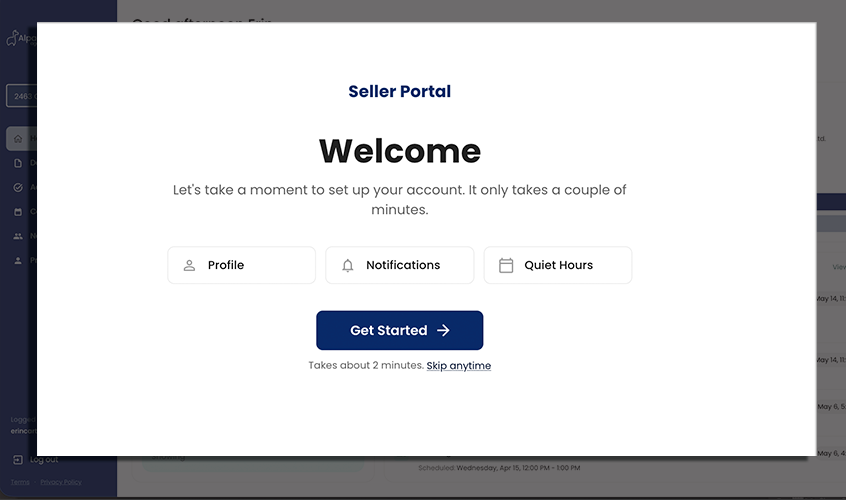
Welcome Wizard Setup— A brief introduction to the portal and a easy step-by-step for the seller to pick their preferences.
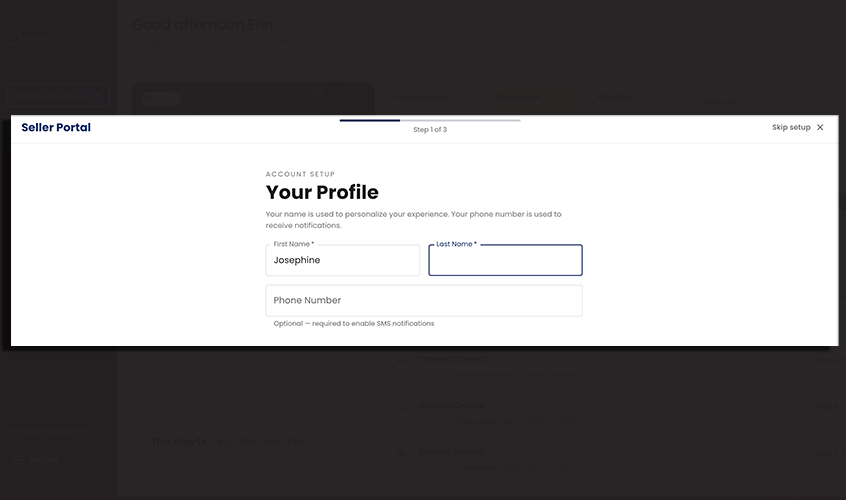
Profile — Confirm or update their name and contact information.
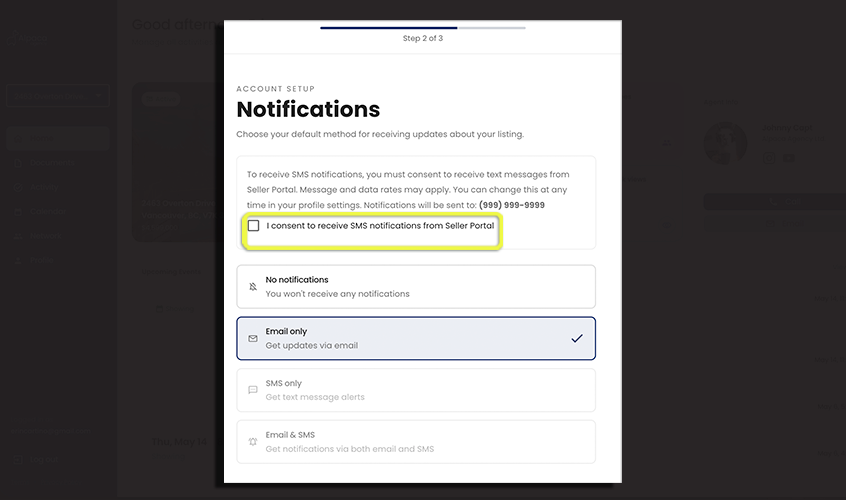
Notifications — Your seller will choose how they want to be notified: email, SMS, both, or none.
The "I consent to receive SMS notifications" checkbox must be clicked before your client can receive SMS notifications.
- Do Not Disturb — Set quiet hours and a timezone so notifications only arrive at appropriate times.
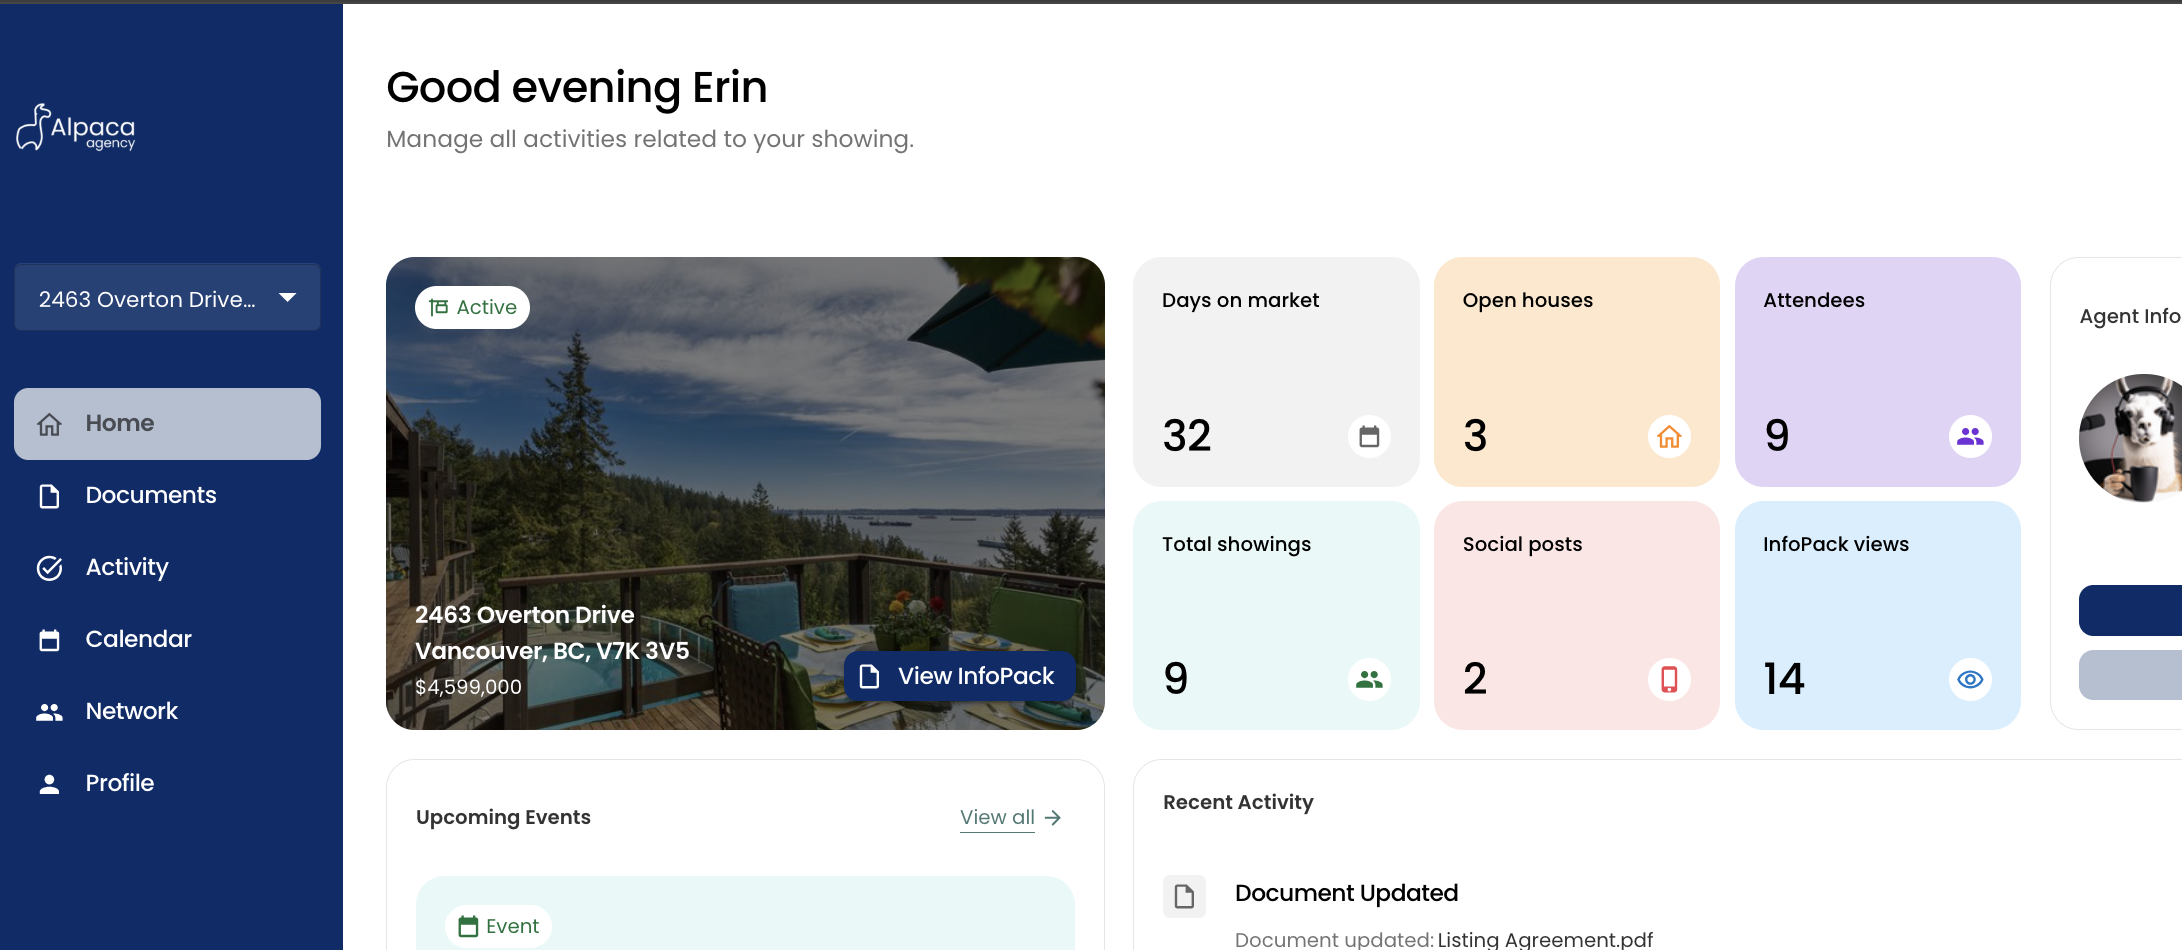
After completing setup, the seller's dashboard loads with all their listing information.
What Sellers See in the Portal
| Section | Contents |
|---|---|
| Agent Profile | Your name, email, phone, brokerage, profile photo, and any configured social media links |
| Listing Overview | Full address, current price, listing status, and a cover photo |
| Key Metrics | Days on market, InfoPack view count, # of open houses, # of Attendees that have come to open house(s), Total # of showings, # of Social Posts |
| Documents | Files you have explicitly shared with the seller (internal documents are never shown) |
| InfoPack | A shareable link to the listing's InfoPack, accessible without login |
| Upcoming Events | Scheduled showings, open houses, and other calendar events with their dates and times |
| Activity Timeline | A live, chronological feed of everything that has happened on the listing, from Showings, Open Houses, Feedback and any General messages you post (As General Activities). |
| Network Partners | Share your Partners/Referral sources directly here with your entire customer base. |
| Historical Transactions | You can link multiple listings, and previous Sold Listings to a clients portal, and they can toggle/select what listing they want to see. |
Portal Display: Events
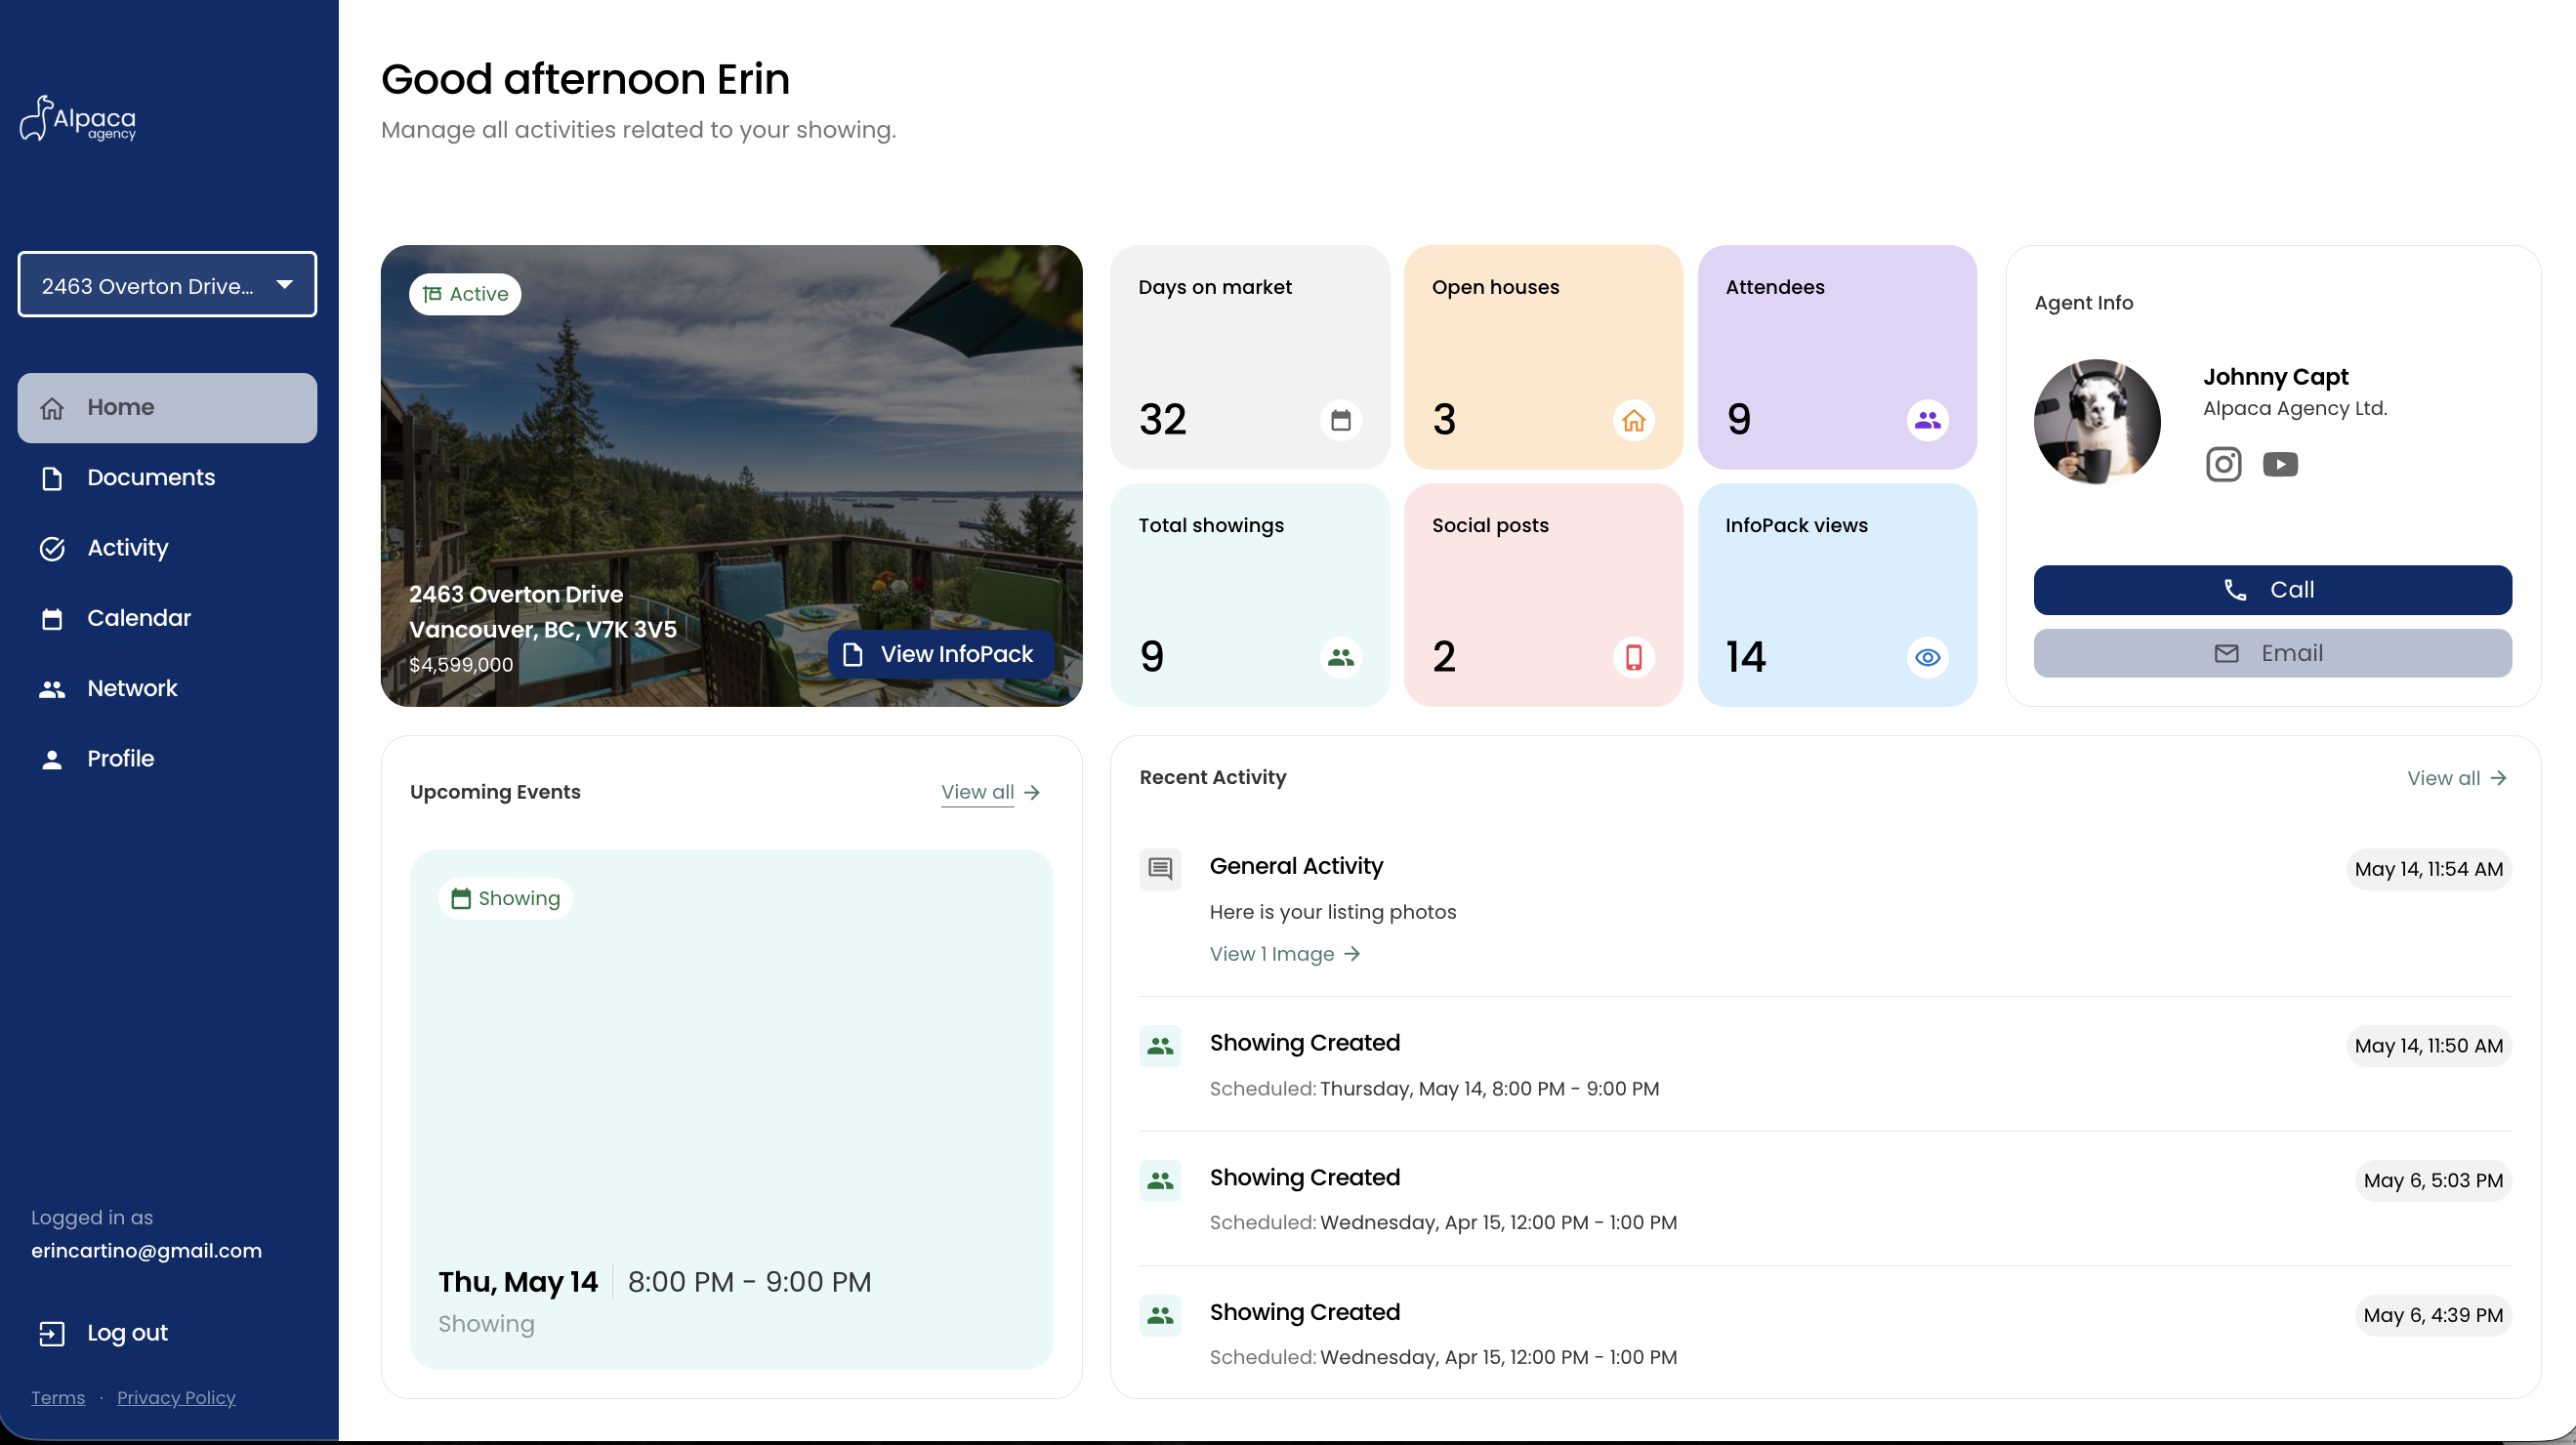
Each booked calendar event on a Listing has a Show in Seller Portal toggle.
General Events (optional display in portal) - you must explicitly enable the toggle when creating or editing an event to make it visible to the seller.
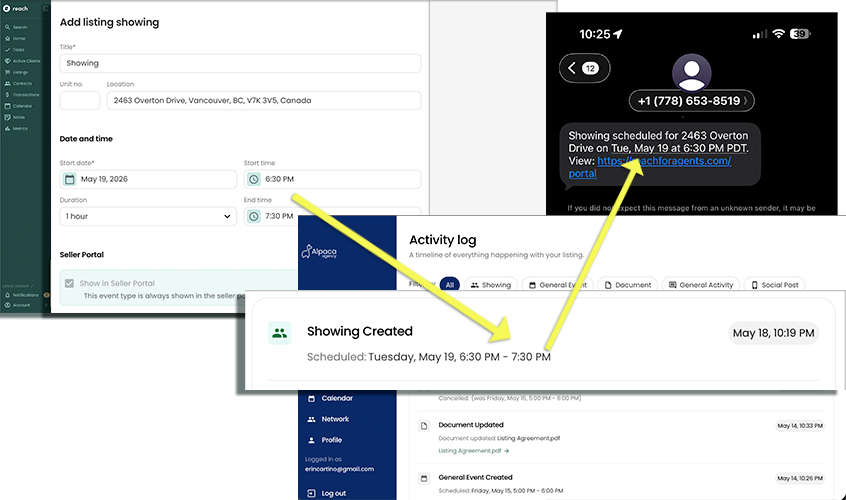
Listing Showing - is pre-selected to display in the portal and will always display (you cannot toggle this off) as Portal's are designed to promote your showings to your seller
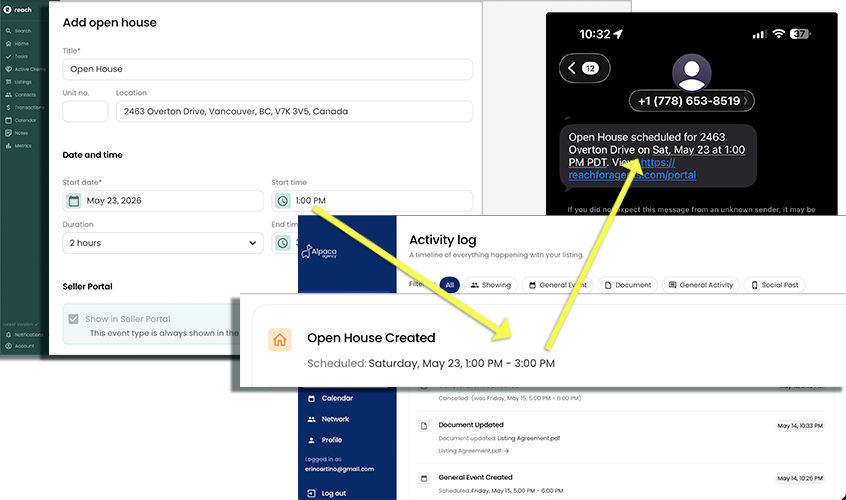
Open House - is pre-selected to display in the portal and will always display (you cannot toggle this off) as Portal's are designed to promote your open house schedule to your seller.
When selecting "Show in Seller Portal" for the above 3 events, this is how it will be displayed in the Sellers portal:
Portal Title, Categories, and Buyer Identifier
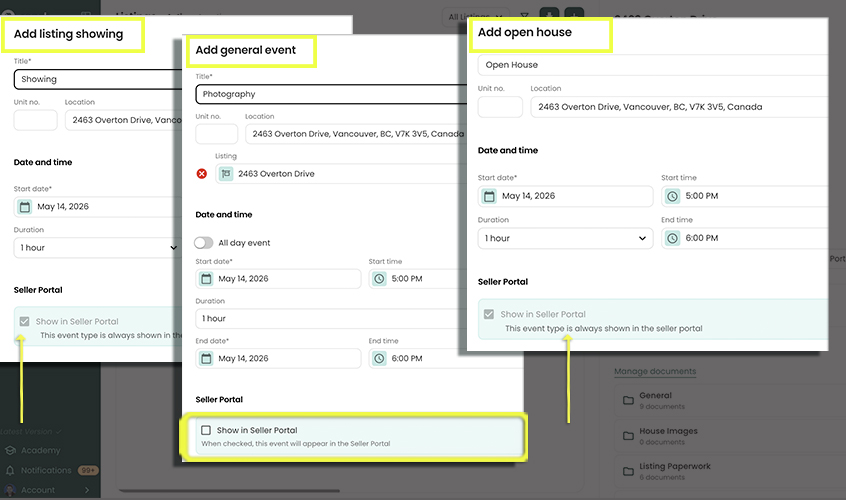
When Show in Seller Portal is enabled ✅ for an event, an expanded Seller Portal section becomes visible on the event form:
- Title (portal-visible) — For General Events, a required, separate Title field controls what the seller sees on their portal. This lets you keep your internal event title private (e.g. "Photog — Alex, 2 hrs, invoice - $250) distinct from the friendly title the seller sees (e.g. "Professional photography"). For Showings + Open House events the label is pre-populated and can be modified by you.
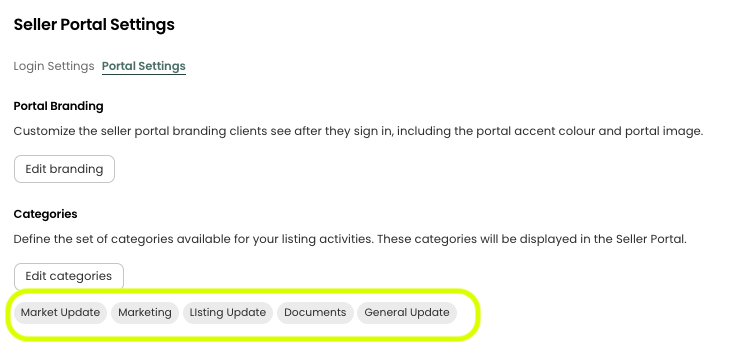
- Categories — Used to group and filter activities inside the seller's portal timeline, making it easier for sellers to see what you are updating them with. Categories are drawn from a predefined list you configure in Account -> Settings -> Seller Portal -> Categories — you can't type free-form values here, so all your listings share a consistent theme or grouping. Not available on Showings.
- Buyer Identifier — A single free-form label used to link a chain of events and activities to the same prospective buyer (e.g. "old couple with dog", "Buyer A"). Reach automatically suggests identifiers you've already used elsewhere on the same listing so re-typing stays consistent. Available on all event types, including Showings.
Categories and buyer identifiers appear as chips beside the activity title in the portal timeline (categories in grey, buyer identifier in blue "Couple from island"), giving both you and the seller a fast way to scan related items.

Portal Display: Documents
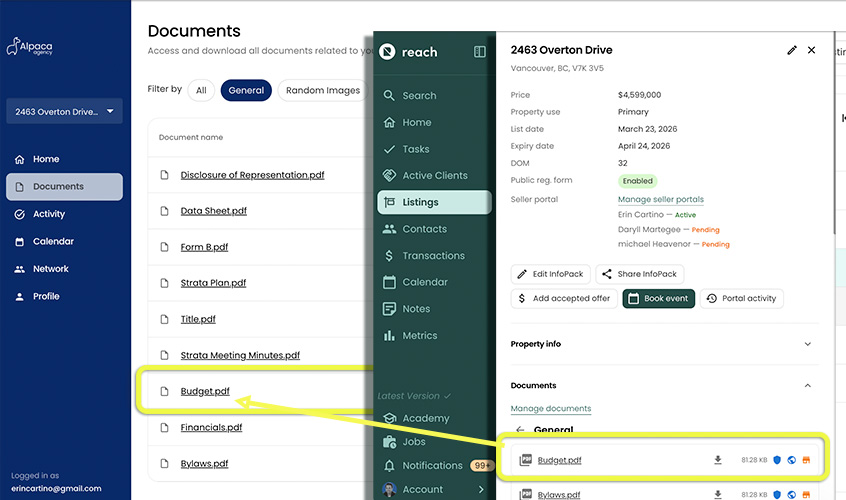
In the listing's document management section, toggle visibility on a per-file basis. Only files you have marked as seller-visible will appear in the portal's Documents section.
Portal Display: Activity Metrics
InfoPack visibility is automatic. If a listing has an InfoPack, view counts will appear in the seller's metrics and an activity entry is created in their feed when the InfoPack is first published. Additionally, Metrics include:
| Metric | Description |
|---|---|
| Days on Market | Counts from your LIST DATE you selected in Reach |
| Open Houses | Counts the number of Booked Events = Open House in Reach |
| Attendees | Keeps track of Open House Attendees via the "Open house feedback" process. Tracking how many people came to your open house. This system lets you publish to portal, any open house Attendee info. |
| Total Showings | Counts the number of Booked Events = Showings in Reach |
| Social Posts | This keeps track of how many Portal Activity updates you perform, and link to a social platform |
| InfoPack Views | How many times infopacks have been viewed. |
Portal Display: Activity Timeline
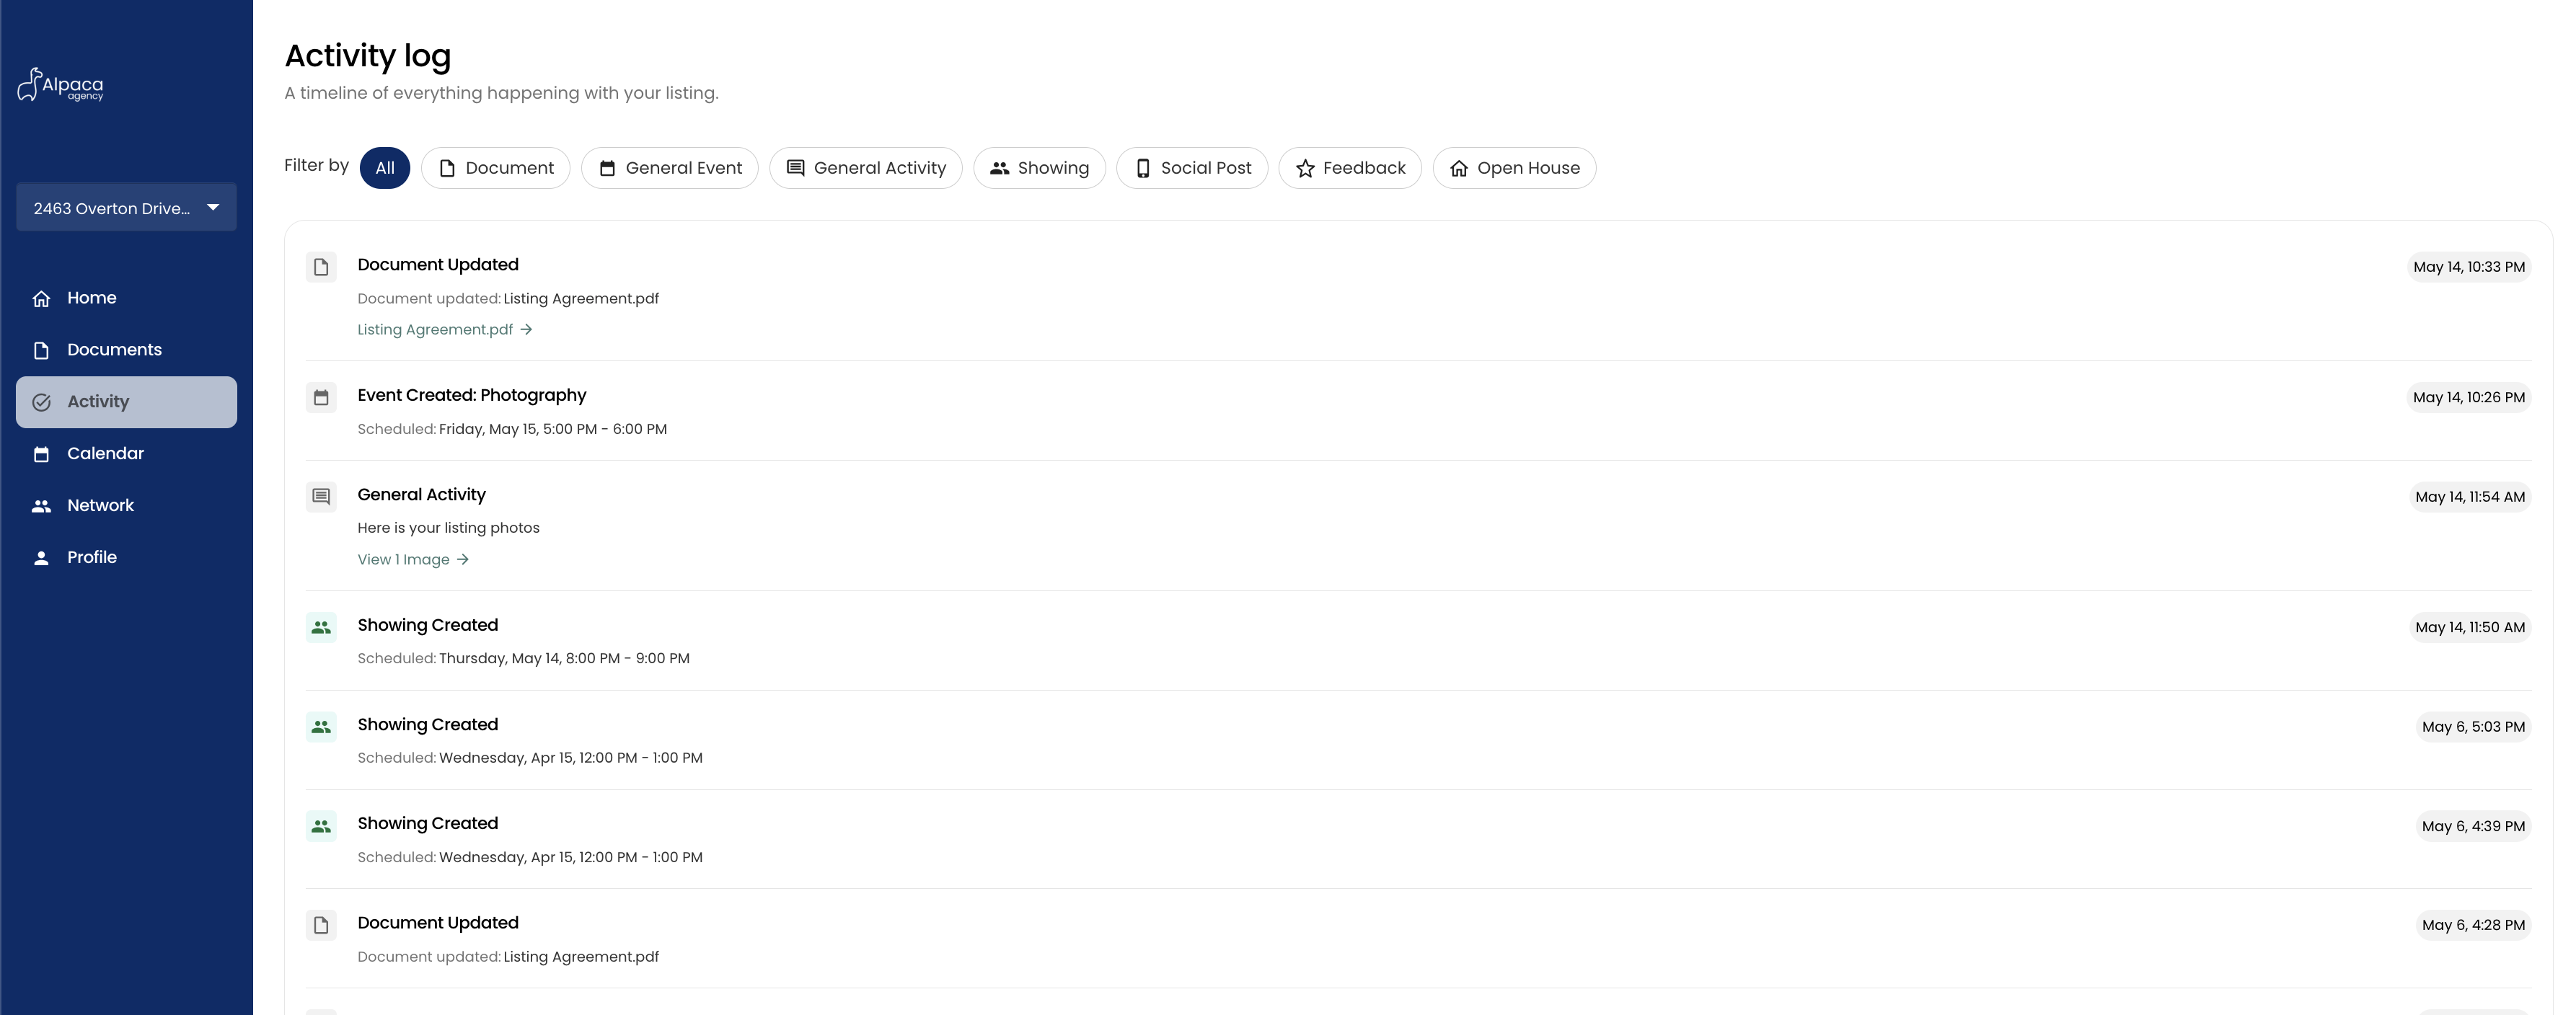
The activity timeline is the core of the seller's portal experience — a chronological feed with the most recent item at the top. Activities fall into two categories: those you create manually, and those generated automatically by the system.
Manual Activities
Create these from the listing's Portal Activity button, in Reach, on the listing you want to generate an Activity Update for. Manual activities can be edited or deleted after they are created.
Select the Listing you want to generate an Activity Update for (A notice to your Seller)
Click the Portal Activity button
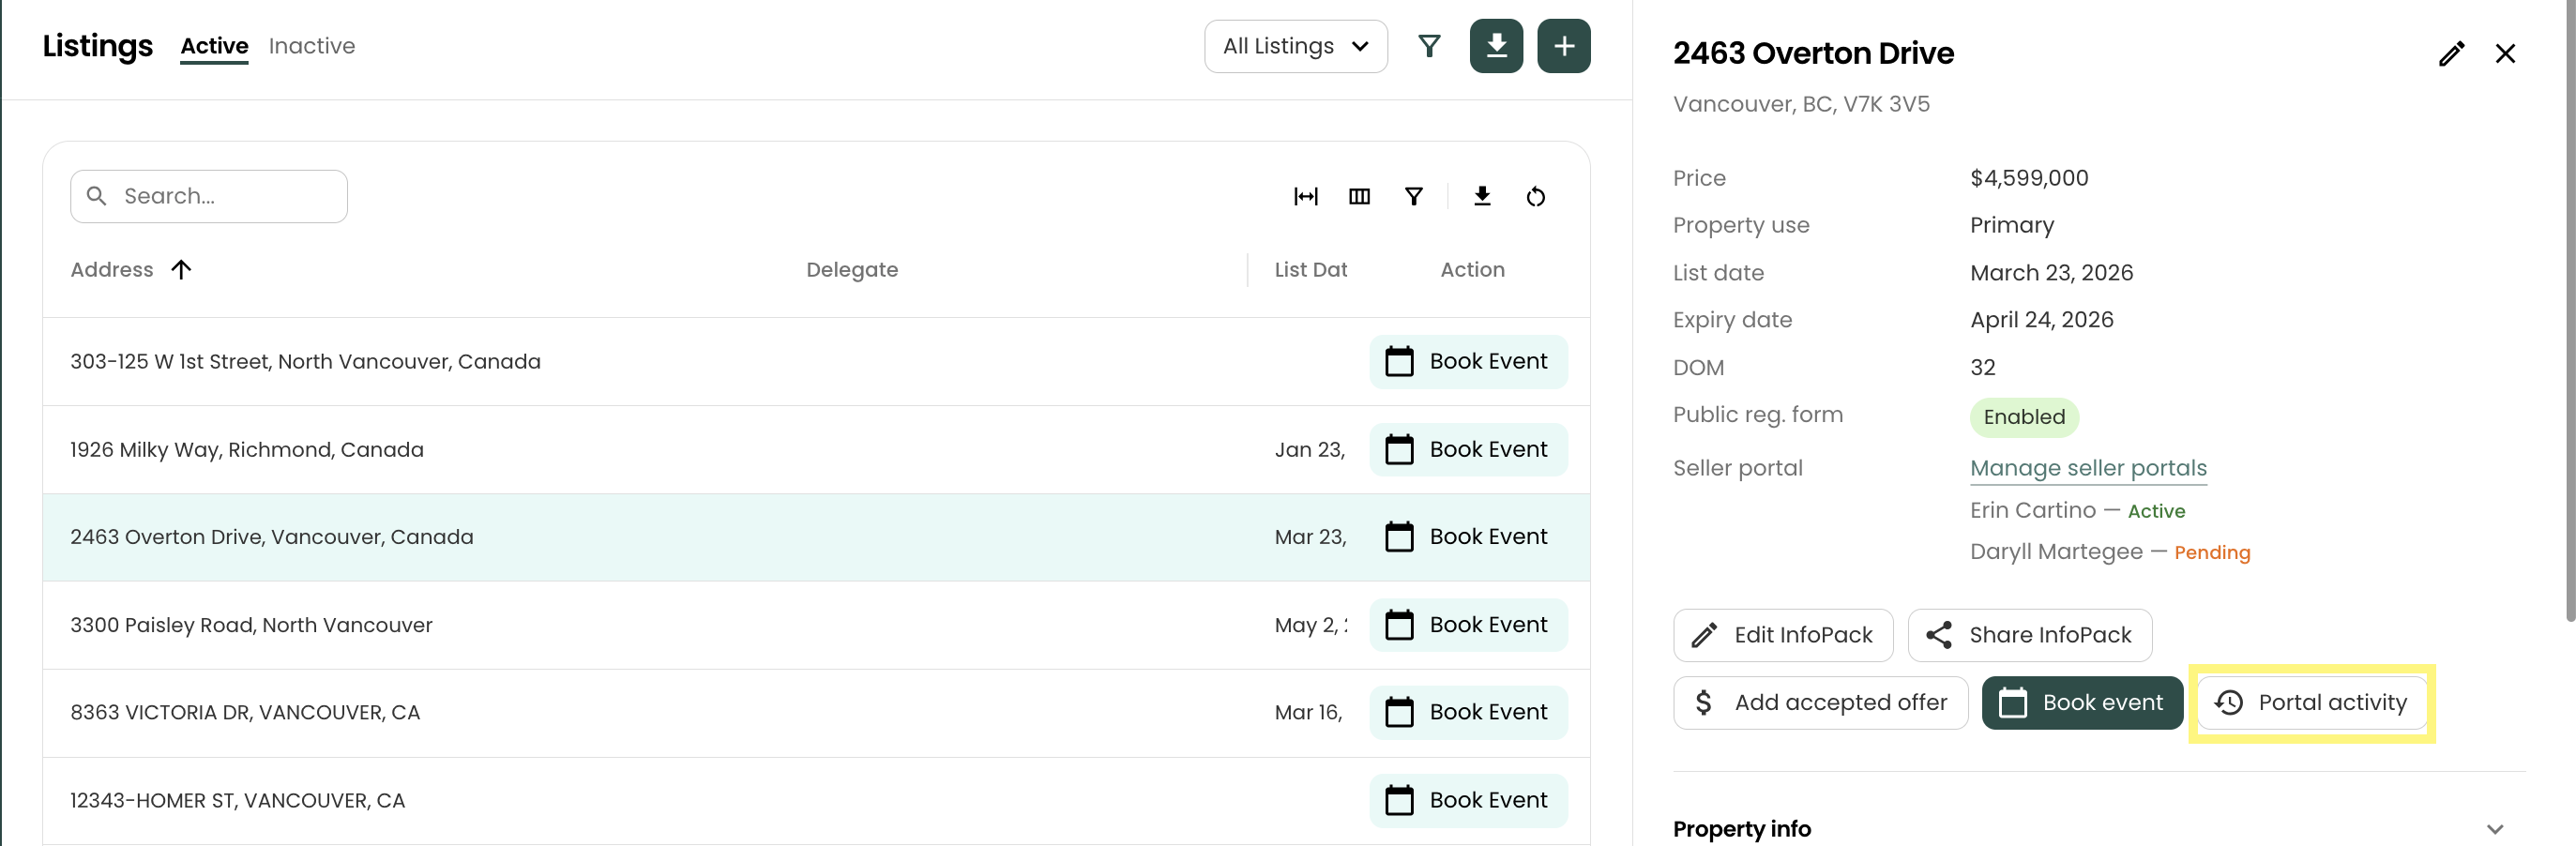
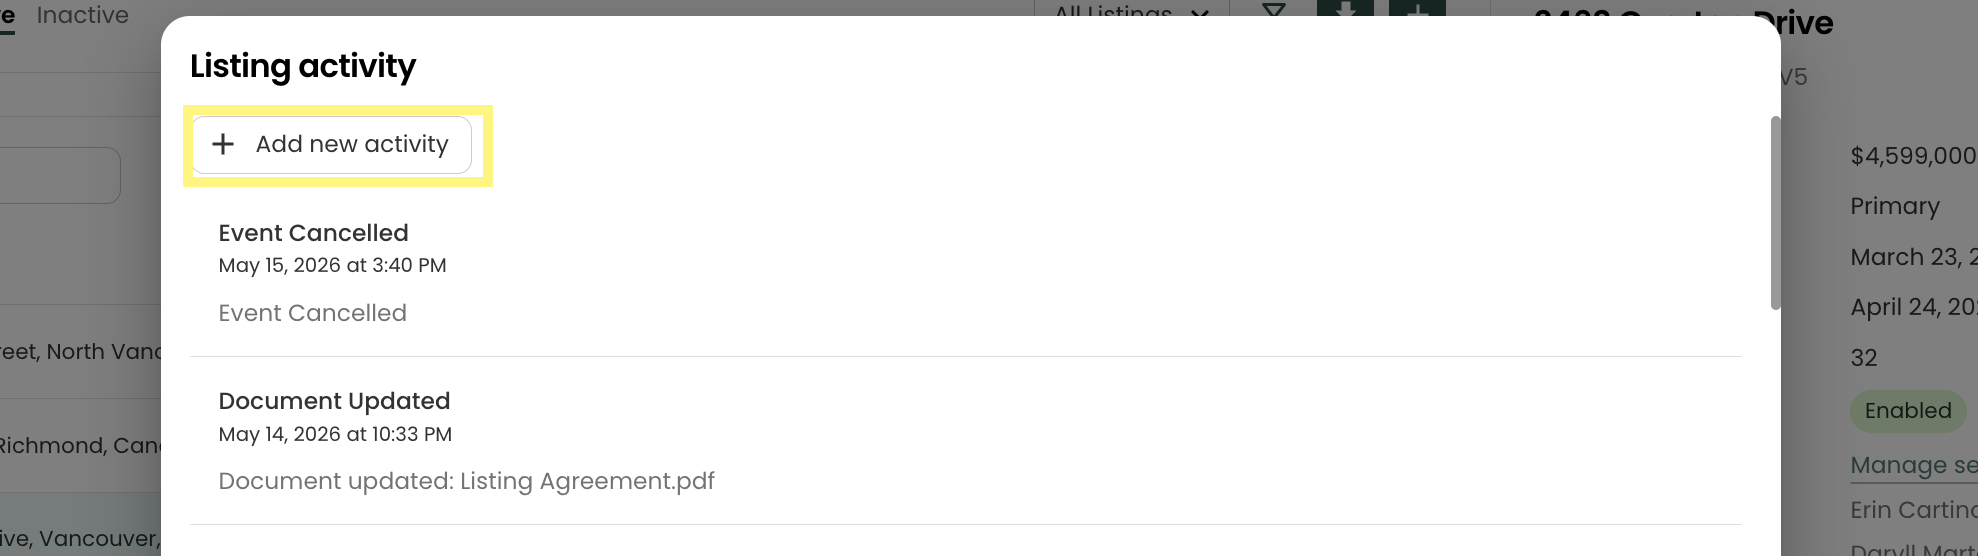
Here you can view all your recent Activity, and Generate a new Activity by selecting + Add new activity
Activity Date vs. Creation Date
Manual activities (General activity and Social Media posts) capture two dates:
- Creation date — when you saved the activity in Reach. Always recorded automatically.
- Activity date — an optional date you set inside the form to represent when the underlying event actually happened. For example, a social media post you're logging today about a promotion that ran last week can be back-dated so the seller sees it on the correct day of their timeline.
Use the Sort by dropdown at the top of the Listing Activity dialog to switch between the two orderings.
General Activity
Use a general activity for free-form updates: market commentary, strategy notes, or any communication that doesn't fit a specific category. You can even drop files or digital assets into this section and update your clients.
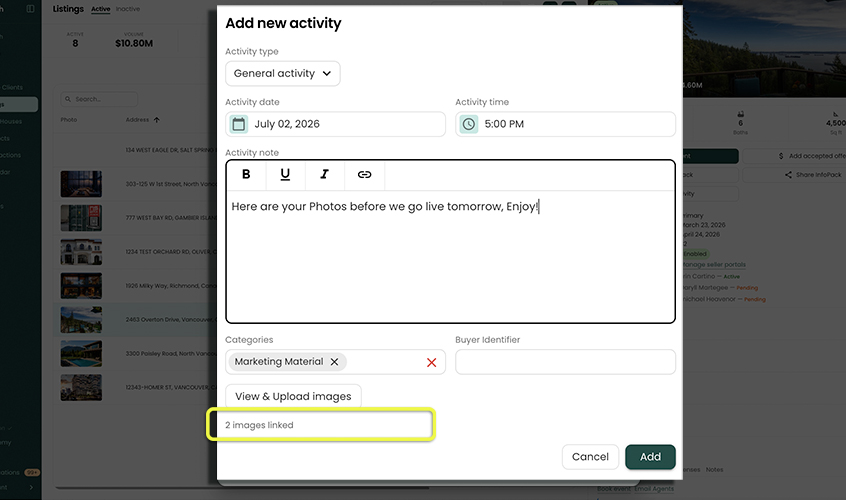
Open the listing's activity section and click Add new activity.
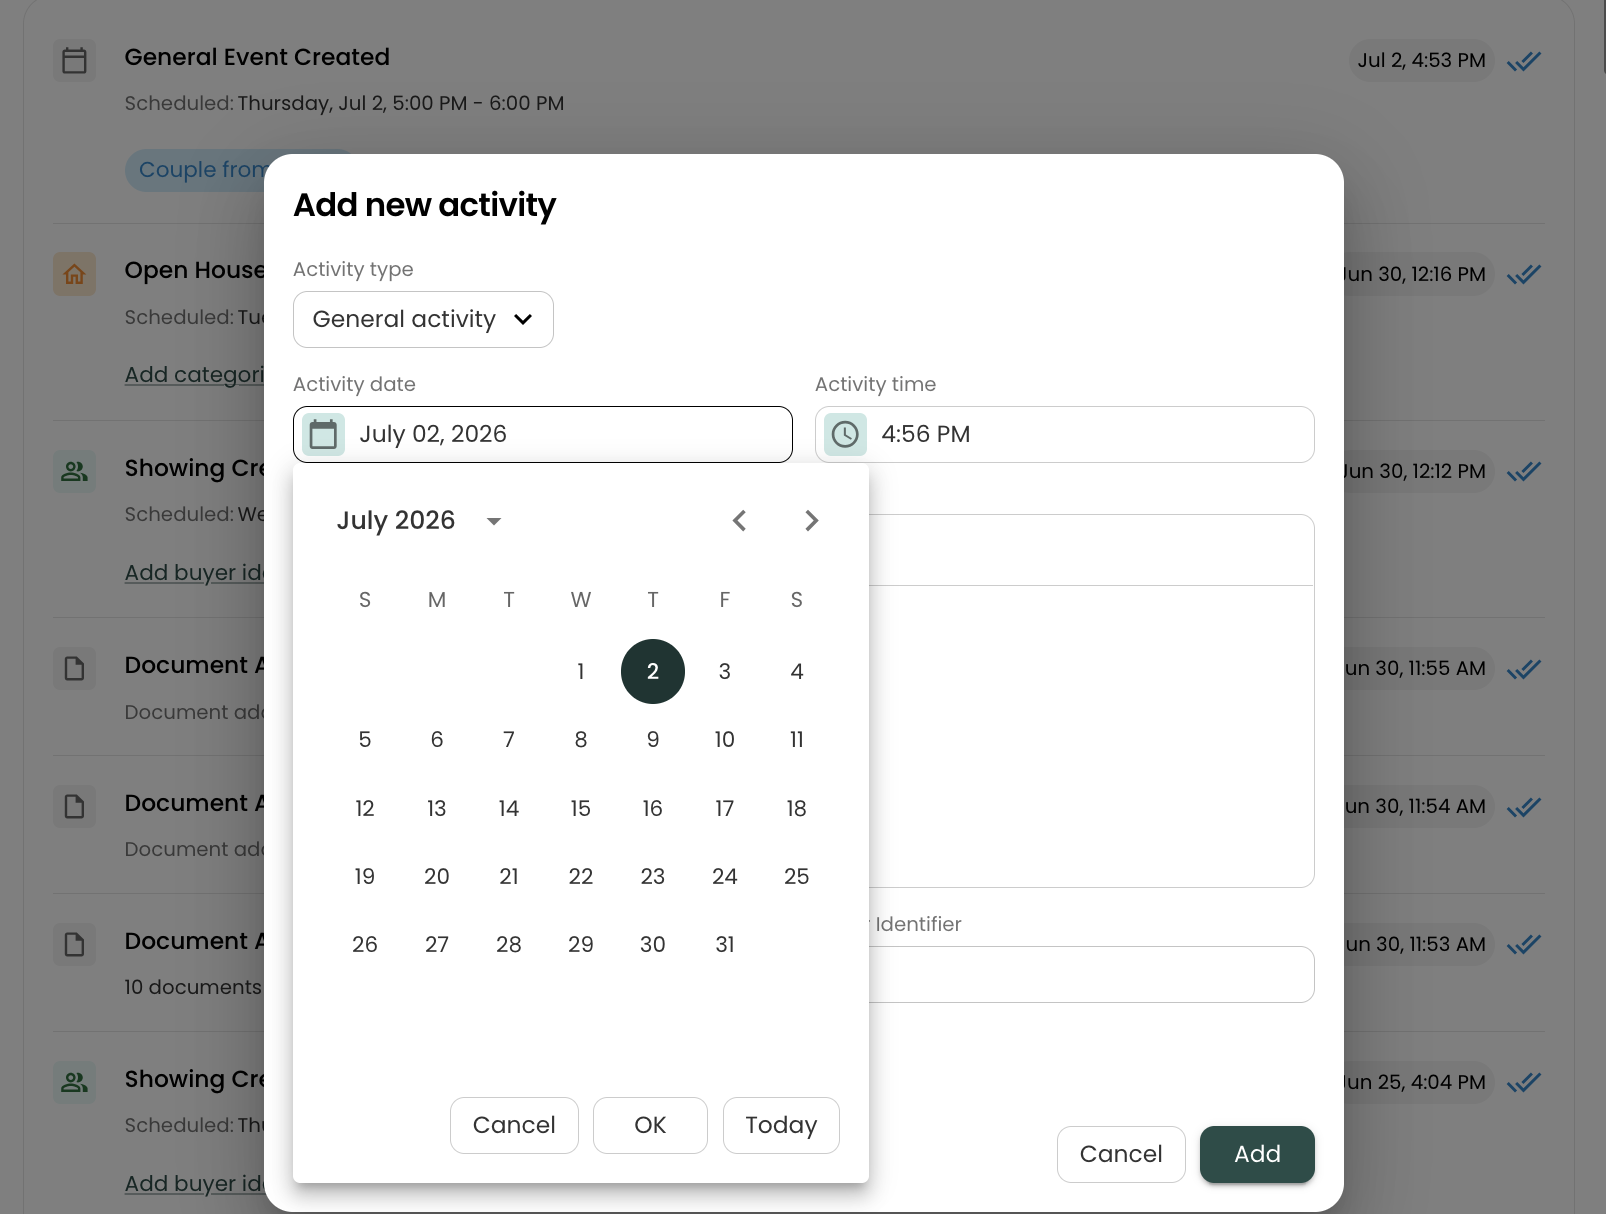
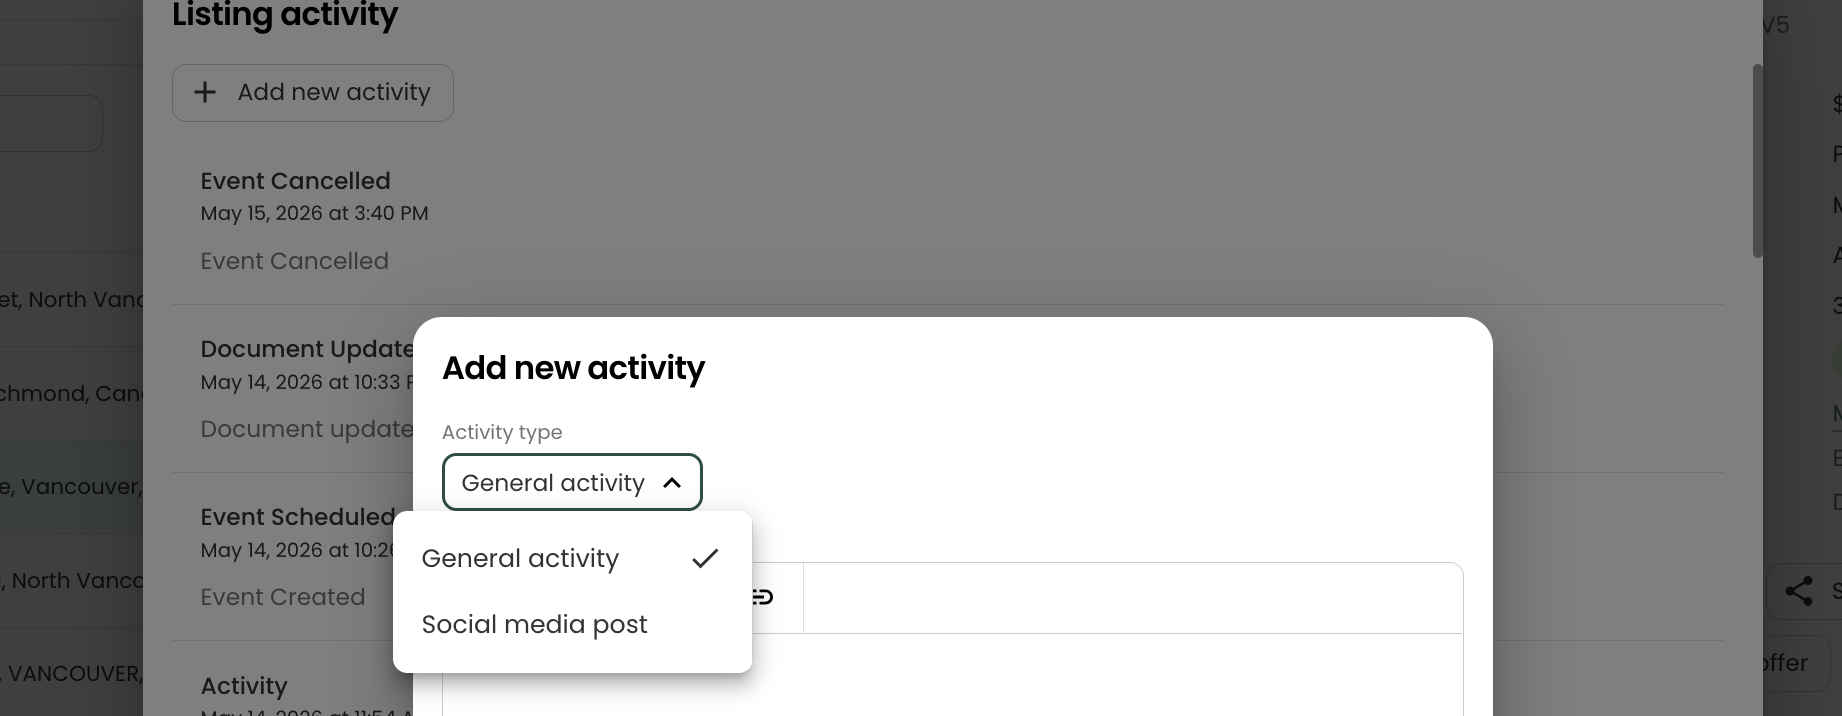
Select General activity from the type dropdown.
Write your update in the Activity note.
i) Optionally set an Activity date/time if the update relates to something that happened on a different day than today.
ii) Optionally choose one or more Categories and a Buyer Identifier — see the section below.
iii) Optionally, click Upload images to attach images inline with the note.
Click Add to save. The activity appears in the timeline labeled "Activity". If you added images, they will appear as a clickable carousel.
Social Media Post
Link the seller directly to a social media post you've made promoting their listing.
- Open the listing's activity section and click Add new activity.
- Select Social media post from the type dropdown.
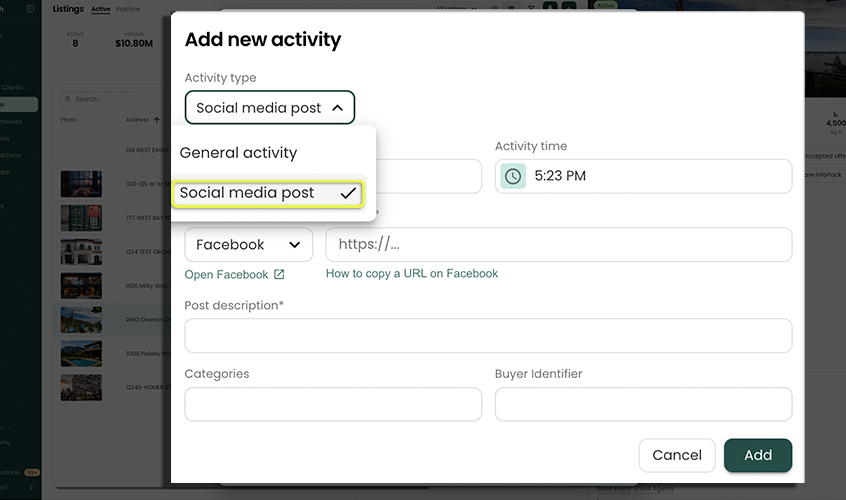
- Choose the Platform (Facebook, Instagram, TikTok, X/Twitter, or YouTube).
- Paste the full Post URL — it must begin with
https://. - Write a Post description (required) — a caption or note about the post.
- Optionally set an Activity date/time matching when the post was published.
- Optionally add Categories and a Buyer Identifier — see the section below.
- Click Add to save. The activity appears labeled "Social Post – [Platform]" with a clickable link to the post.
Categories & Buyer Identifiers on Activities
Both General Activity and Social Media Post forms include the same Categories and Buyer Identifier pickers described in the Portal Title, Categories, and Buyer Identifier section for events:
- Categories are pulled from your predefined set at Settings → Seller Portal → Categories. Free-typing is disabled here, so every listing shares the same taxonomy.
- Buyer Identifier is a free-form label used to group all activities and events related to a specific prospective buyer. Reach auto-suggests identifiers you've already used on this listing.
Chips appear next to the activity's title on the seller's portal timeline (categories in grey, buyer identifier in blue).
Editing Event Categories & Buyer Identifier from the Activity Dialog
For automatically-generated activities (Showings, Open Houses, Feedback, Open House Reports, generic Events), the categories and buyer identifier belong to the underlying event — you don't need to open the event editor to change them. From the Listing Activity dialog, click Add categories or buyer identifier (or the pencil next to existing chips) under any auto-generated row. A dialog opens where you can edit those fields directly and save — the change flows through to every activity generated by that event. For Showings, only the buyer identifier is editable (Showings don't take categories).
Editing and Deleting Manual Activities
Each manual activity row has a pencil icon to re-open and edit the activity, and a trash icon to delete it. Deletion requires confirmation before the activity is permanently removed.
Automatically Generated Activities
The system creates these activities whenever specific events occur on the listing. No action is required from you — they appear in the portal automatically and cannot be edited or deleted.
Showings
| Event | Activity Label |
|---|---|
| A showing is booked | Showing Scheduled |
| The showing date or time changes | Showing Rescheduled |
| The showing is cancelled | Showing Cancelled |
When a showing is rescheduled, the activity preserves both the original and new date/time so the seller can see exactly what changed. NOTE: The Seller will most likely receive an email or SMS/Txt message notification (if setup)
Open Houses
| Event | Activity Label |
|---|---|
| An open house is scheduled | Open House Scheduled |
| The open house date or time changes | Open House Rescheduled |
| The open house is cancelled | Open House Cancelled |
Calendar Events
Generic calendar events (e.g., a photography session, a staging appointment) only appear in the portal if you have turned on the Show in Seller Portal toggle on that event.
| Event | Activity Label |
|---|---|
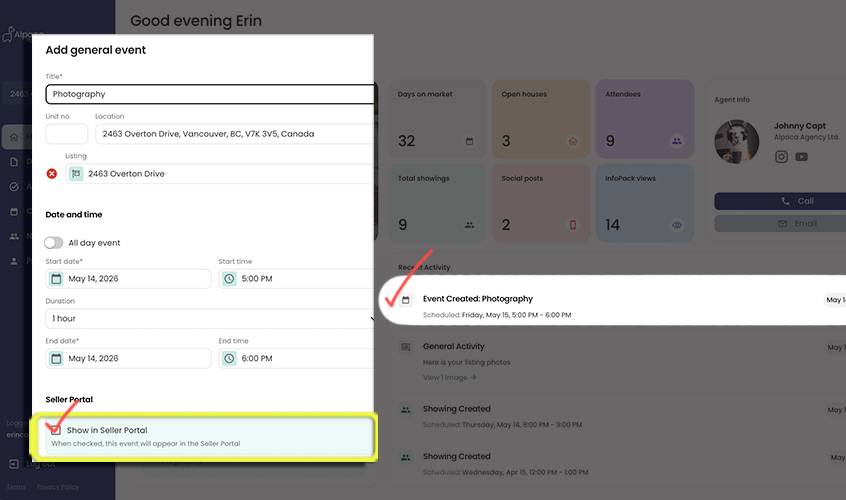
| A generic event is created (portal visibility on) | Event Scheduled |
| The event date or time changes | Event Rescheduled |
| The event is cancelled | Event Cancelled |
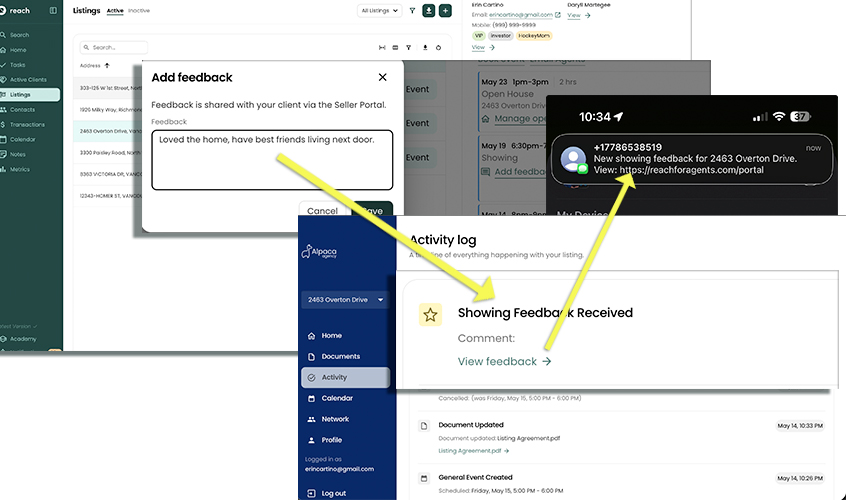
Showing Feedback
When you add or update notes on a showing — such as feedback from the buyer's agent — an activity is automatically created so the seller is kept in the loop.
Simply tap the "Add Feedback" button under the showing information in the Activity tab (Event tab) and you can follow the prompts. The feedback dialog also lets you set a Buyer Identifier (and, for non-showing events, Categories) so the feedback item can be grouped with the rest of that buyer's timeline.
| Event | Activity Label |
|---|---|
| Feedback is added to a showing | Feedback Added |
| Existing feedback is updated | Feedback Updated |
Open House Reports
Open house reports let you capture what happened at an open house — who came, notes on each attendee, and a single summary paragraph — and publish that to the seller when you're ready. For more information, refer to Managing an Open House.
| Event | Activity Label |
|---|---|
| An open house report is published | Open House Report Added |
| A published report is updated | Open House Report Updated |
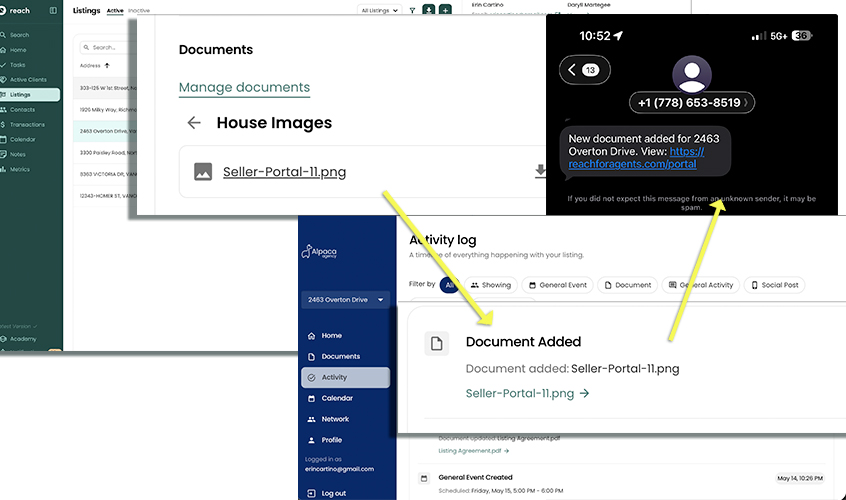
Documents
When you add a document to the listing and mark it as visible to the seller, an activity links them to the new file. If the document is later replaced or updated, a second activity is created.
| Event | Activity Label |
|---|---|
| A seller-visible document is added | Document Added |
| A seller-visible document is updated | Document Updated |
InfoPack
| Event | Activity Label |
|---|---|
| An InfoPack is created for the listing | InfoPack Created |
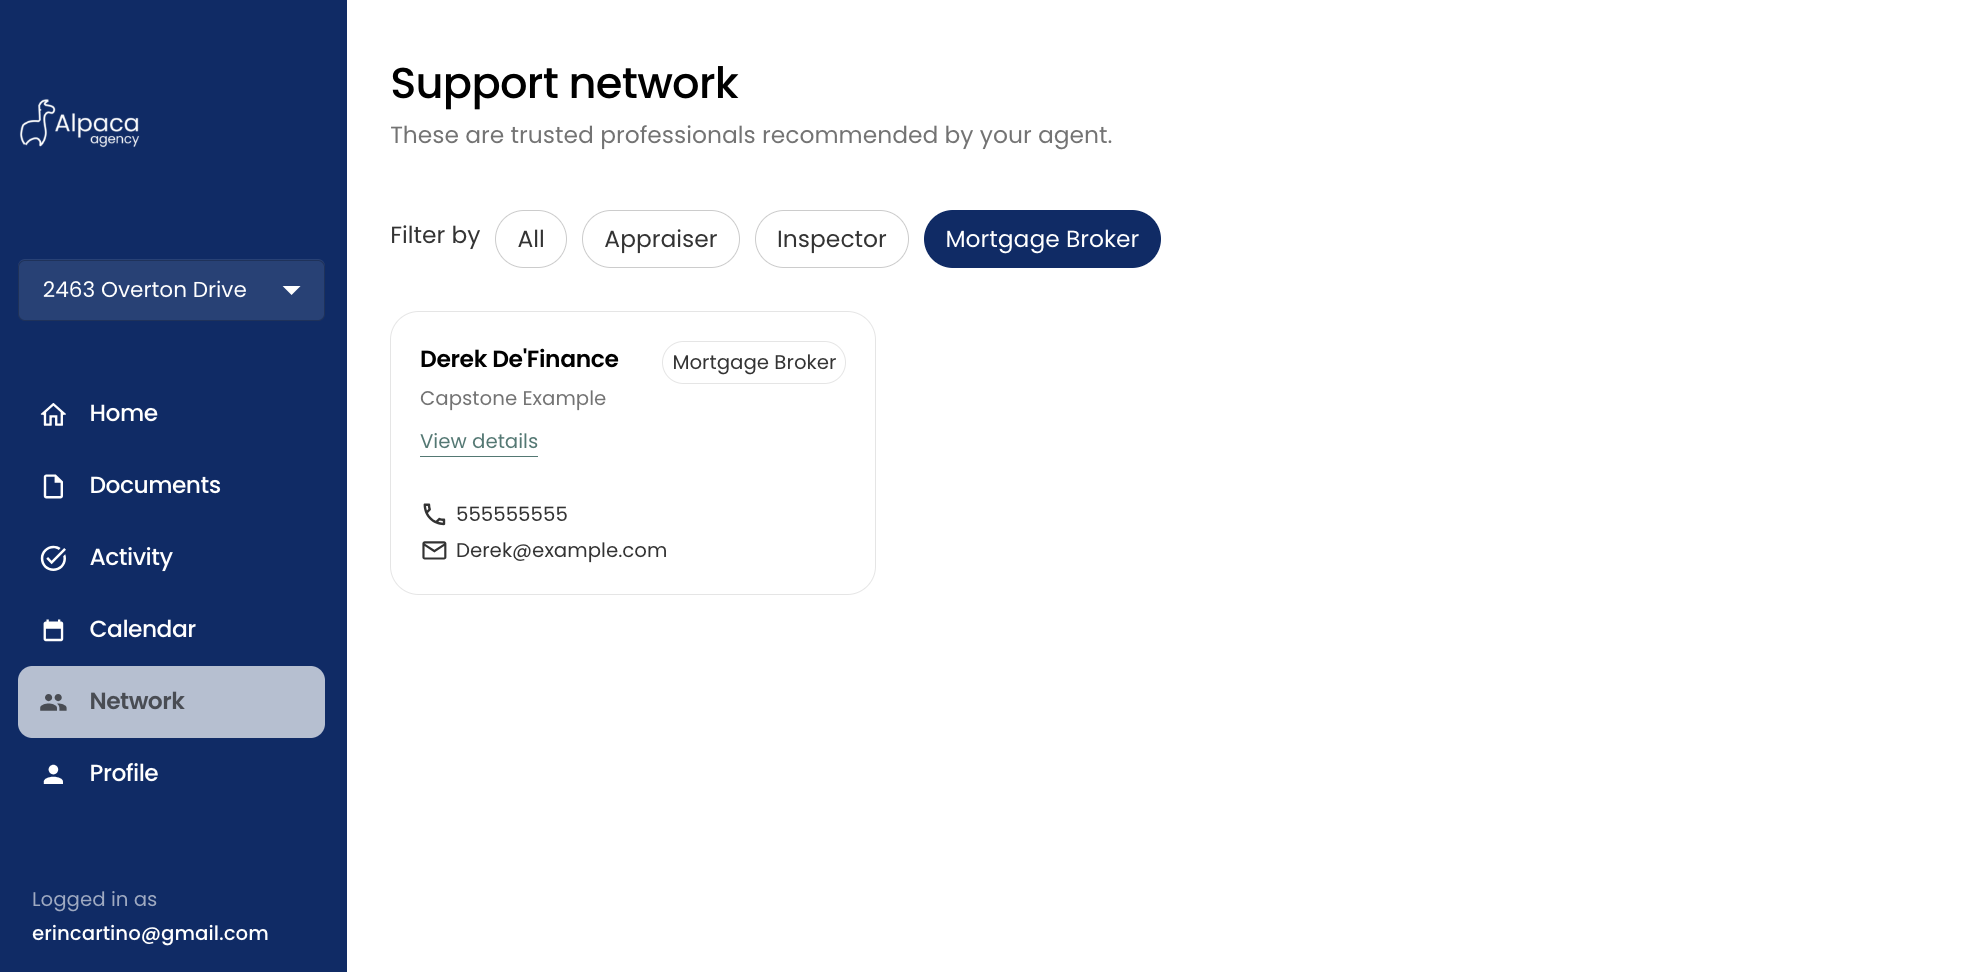
Referral Partners
You can use your Seller Portal to publicize and promote your referral network of valuable professionals. Whether its Plumbers, Painters, Mortgage Brokers or inspectors, you can categorize and showcase whichever professionals you wish, to your Sellers.
To to your Reach CRM, and select Contacts
Along the top, choose Network ("Network Partners")
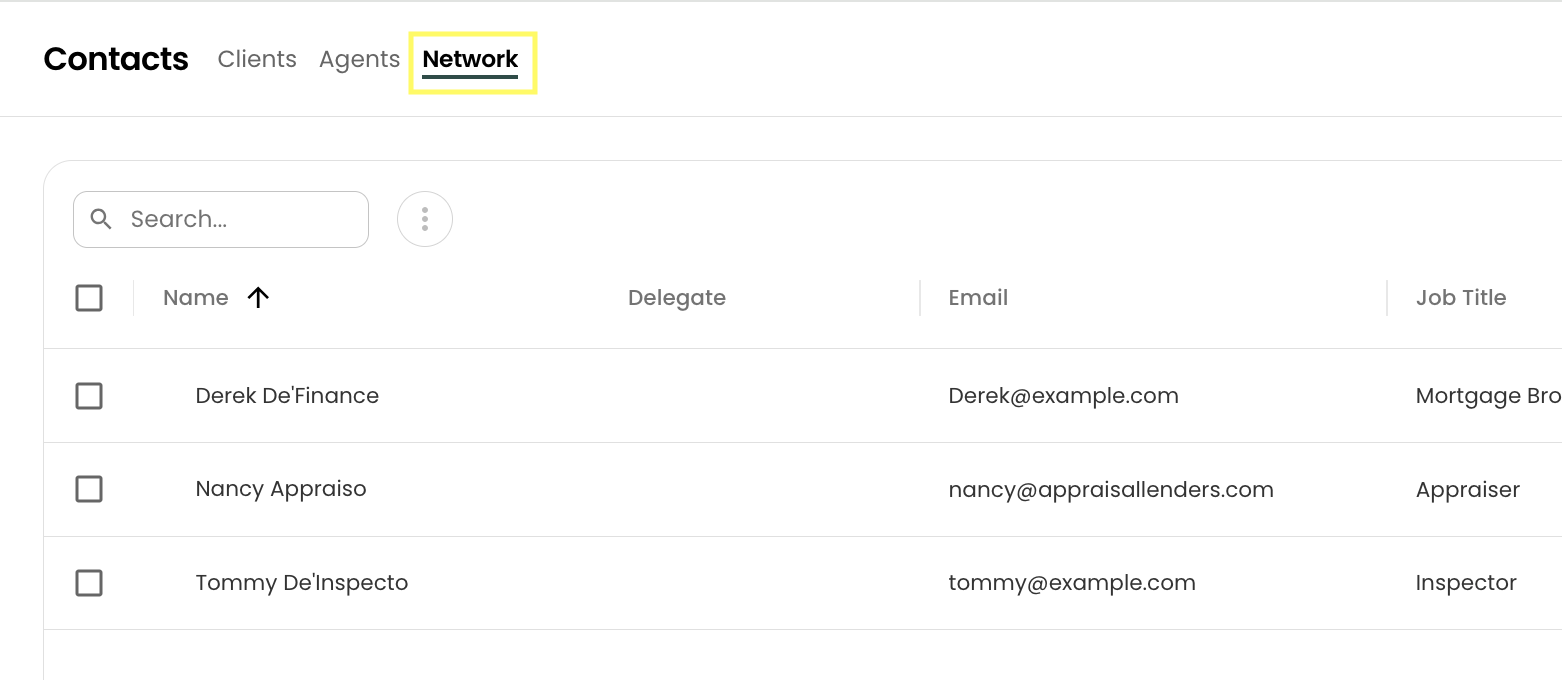
Add or Edit any Network Partner Contact you have and make sure that you:
Input all the necessary info for that Contact
Give them a Job Title that reflects their profession (ie: Inspector, Painter) as Reach will use this as the Category that is shown in the Portal
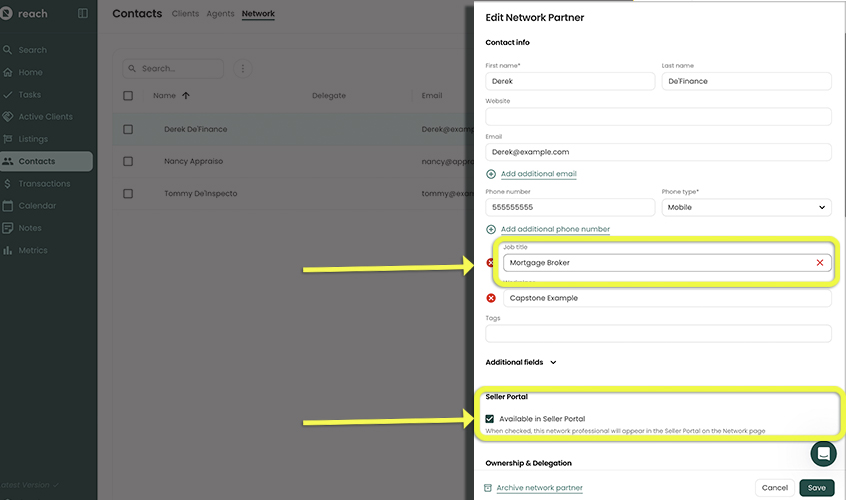
Make sure you select "Available in Seller Portal" to make this contact available to all your sellers.
infoYou cannot toggle on/off for different Sellers. In this case, Derek De'Finance, Mortgage Broker will be available for All your Sellers to see.
Your seller will see the following: