Events
There are two types of Events in the Reach ecosystem: General Events and Showing Events (Listing Showing & Buyer Showing).
General Events are versatile and can be linked to other items such as a Client, Listing, or Transaction. They’re perfect for meetings, calls, key dates, or anything that doesn’t fit into a showing format.
Showing Events are purpose-built for property showings and must be linked to either a Listing or a Buyer Active Client, ensuring your showing activity is always organized and properly associated. Additionally, these Events allow connecting "Buyer or Seller Agents" contact details, and auto-sending InfoPacks (if selected).
This structure gives you both the flexibility to manage your schedule and the precision to track showings effortlessly.
General Events
Create a General Event
To start creating a new Reach Event, follow these steps:
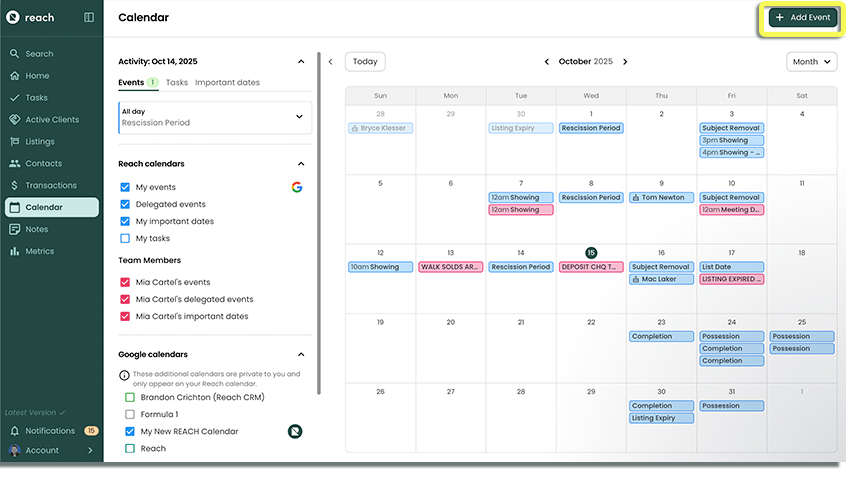
In the sidebar, click on Calendar
Click the + Add Event button
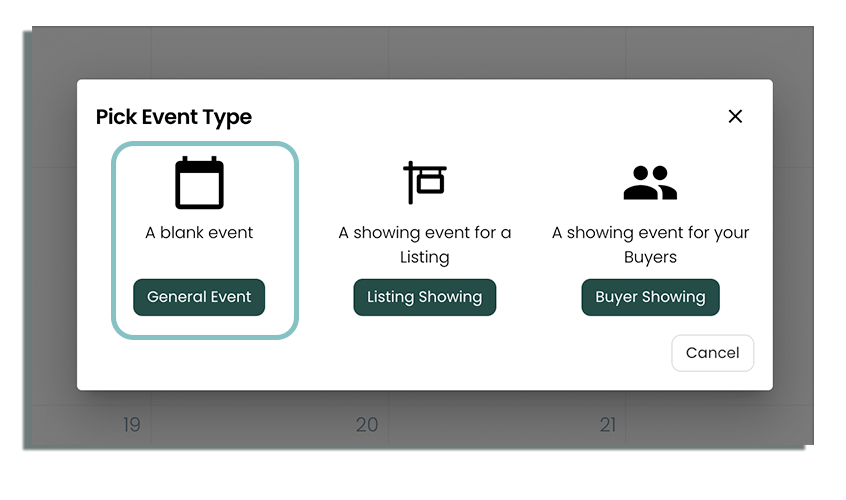
Select General Event
Enter a Title for your Event
Do not add a Listing, Client, or Transaction
Enter the time your Event Starts
Enter the time your Event Ends
Optional, enter a Note for your Event
Optional, [teams] Delegate the event to someone (this will put the event in their calendar).
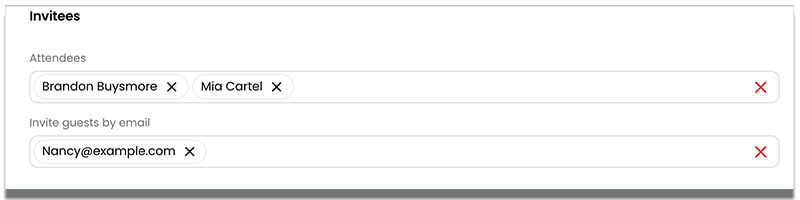
Optional, Invitee:
Add an Attendee, a team member that you want to be a part of the event. This will add the Event to your calendar, and the Attendee calendar.
Invite guest by email, this sends any email address in this box, a google invite or outlook invitation to join your event. NOTE: This will allow the "guest" to see all the details including the agent details you've connected to the event.
Optional, Add a Reminder.
Click Save
You are now the owner of this created Event.
Create a General Linked Event
To start creating a new Event that is associated with another item within Reach, follow these steps:
- In the sidebar, click on Calendar
- Click the + Add Event button
- Select General Event
- Enter a Title for your Event
- Select a Client, Listing, or Transaction that belongs to yourself or a team member
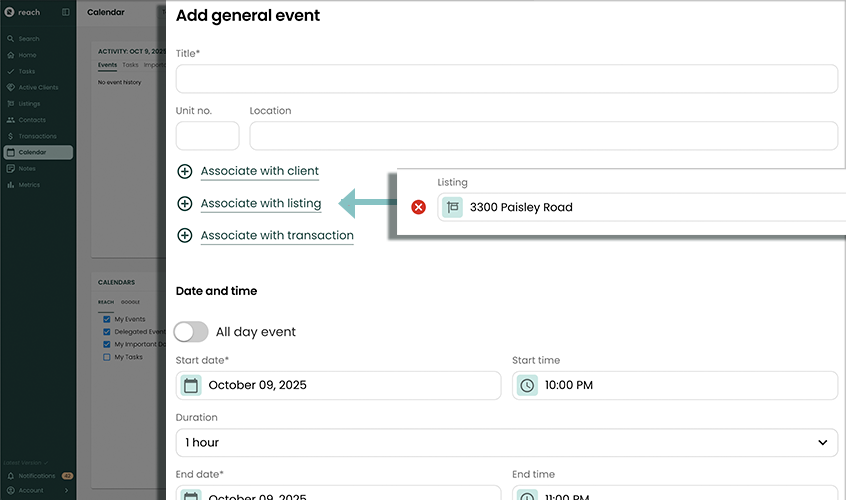
- Enter the time your Event Starts.
- Enter the time your Event Ends
- Enter an optional Note for your event
- Click Save
Just because you created this Event does not mean you are the owner; a linked Reach Event is owned by the same Reach user who owns the linked item.
For more information, read Understanding Ownership
Showing Events
Showing Events in Reach are divided into Listing Showings and Buyer Showings.
Listing Showings track when your listings are shown to prospective buyers, giving you a clear record of activity in the "Activty Tracker" of your listing, and can send InfoPacks directly to a buyers agent.
Buyer Showings track when you’re out touring properties with your active buyer clients, keeping their search organized and easy to reference later.
While these events are most commonly scheduled directly from a Listing or Buyer Active Client page, they can also be booked through the Calendar for added flexibility and speed.
Showing Events offer the following features:
- Automatically linked to a Listing or a Buyer Active Client that cannot be changed
- Can attach additional Agent information (a "Listing Agent" for Buyer Showings or a "Buyer's Agent" for Listing Showings) making it efficient to email InfoPacks to buyer agents or mass email agents that have shown your property.
For more information on InfoPacks, read InfoPacks
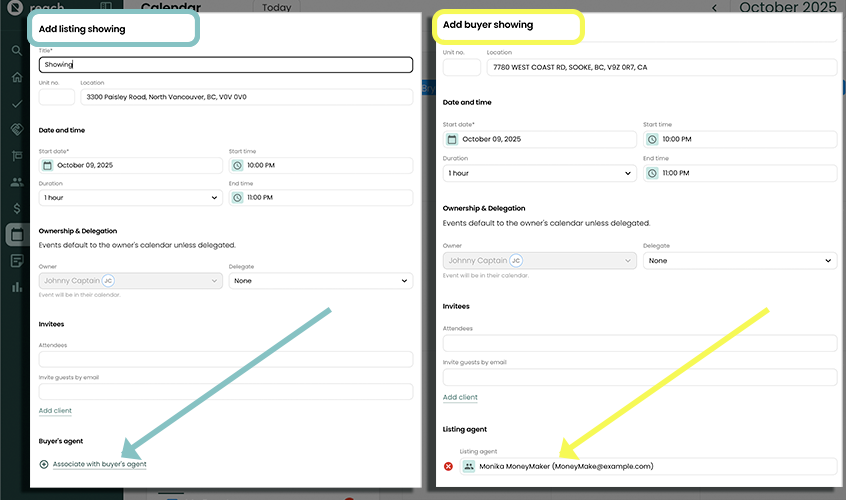
Create a Listing Showing
You can create a Listing Showing when viewing the Listing using the "Book Event" button or you can create it via the Calendar. Steps for Calendar are listed below:
- In the sidebar, click on Calendar
- Click the + Add Event Button
- Select Listing Showing
- Select the Listing from the dialog that appears
- Enter the time your Event Starts
- Enter the time your Event Ends
- Optionally add the Buyer's Agent that is showing your Listing
- Enter an optional Note
- Click Save
The owner of this Listing Showing is the team member who happens to own the Listing.
Create a Buyer Showing
You can create a Buyer Showing when viewing the Active Client using the "Book Event" button or you can create it via the Calendar. Steps for Calendar are listed below:
- In the sidebar, click on Calendar
- Click the + Add Event Button
- Select Buyer Showing
- Select the Active Client from the dialog that appears
- Enter the Location (address) of the property you are showing
- Enter the time your Event Starts
- Enter the time your Event Ends
- Optionally add the Listing Agent of the property you are showing
- Enter an optional Note
- Click Save
The owner of this Buyer Showing is the team member who happens to own the Buyer Active Client.
Synced Events (Google or Outlook)
When creating or editing an Event that is synced with a Google or Outlook Calendar, additional properties are available.
Reminders
Reach allows you to configure event reminders. Reminders are either "Email" or "Notification" reminders. An "Email" reminder means that Google or Outlook will send you an email (specifically to the email that is the owner of the synced calendar). A "Notification" reminder is used by applications that can send push notifications. Consider the following "Notification" examples:
- iCal can understand "Notification" reminders on Google Events and send you a push notification (your iPhone settings must allow push notifications from iCal)
- The Windows Calendar app can be configured with a Google Calendar. If allowed to do so based on your settings, it can send you a Windows push notification which will momentarily show up on your screen and can be viewed in the list of Windows notifications until dismissed.
- Google Calendar in the browser can be configured to send notifications. When Google Calendar is open, it will send you visual notifications of an Event in the browser.
In all of these examples above, a 3rd party application is responsible for understanding the event "notification" reminder and sending a push notification to your device. Depending on device settings, you may have these kinds of notifications turned off.
Reach itself does not send push notifications. 3rd party applications (e.g. iCal, Windows Calendar App, Google Calendar app, etc) are responsible for push notifications.
Guest Invite
Events that are synced with Google or Outlook allows inviting other people to the Event. This can be particularly useful. For example, you may book a Buyer Showing and you want to send a calendar invite to your Buyers. Follow the steps below:
- In the sidebar, click on Calendar
- Click the + Add Event button
- Select General Event or a Showing Event
- Enter a Title for your Event
- In the Guests field, type in a list of email addresses you wish to send calendar invites to
- Enter the time your Event Starts
- Enter the time your Event Ends
- Click Save
Google or Outlook will send event invites out to the emails specified in the Guests field. Although the Event will show up in their calendars, some recipients may have event invitation emails turned off.
The default behavior is that guests cannot see the guest list (i.e. they cannot see the other email addresses of the other people invited) and guests receive updates for any event changes. To change these settings after an event is created, change them in the event in the Google or Outlook calendar.
The status of guests (whether a guest has accepted or denied the invitation) cannot be seen in Reach at this time.
Touchbase Events
If you have integrated your Touchbase calendar, showing appointments from Touchbase will appear directly on your Reach calendar. Confirmed events that haven't yet been added to Reach will feature a pulsing border animation to draw your attention.
Converting a Touchbase Event to Reach
To turn a Touchbase appointment into a Reach Showing event:
- In the Touchbase Feed (on the left side), click on the "Add to Reach" button. This button is only shown on Confirmed Touchbase events.
- Click the Add to Reach button.
- The dialog will intelligently guess whether you are the listing or showing agent, attempt to match existing listings or buyers in your system, and automatically extract the agent's name, phone number, brokerage, and property address from the Touchbase event description.
- You will be prompted to confirm the details and optionally create new agent contacts automatically.
- Click Save to complete the conversion.
Once converted, the event acts as a standard Reach Showing event, complete with auto-populated property and agent details.
Repeating Events
A repeating event is an event that repeats multiple times. For example, you may a daily team sync every Friday morning you review the latest housing statistics. Instead of having to create an event for every occurrence, Reach allows you to create a repeating event. You can select how many occurrences happen, or a specific end date.
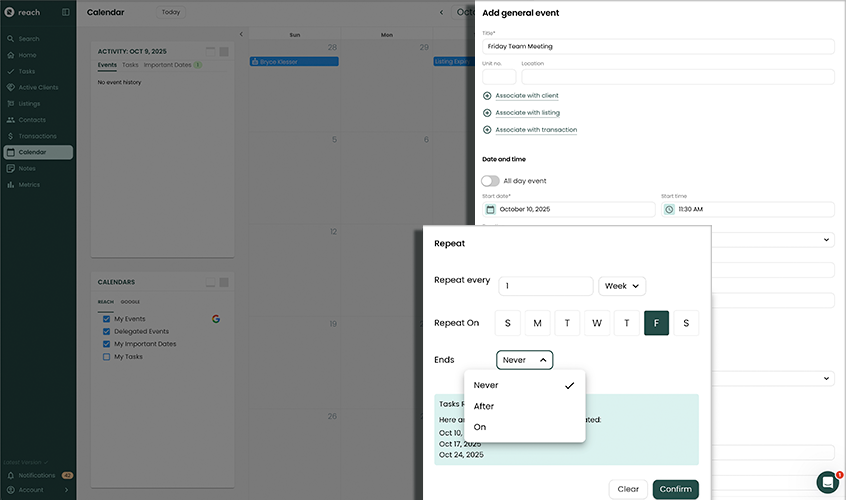
Creating a Repeating Event
To create a repeating event, do the following:
In the sidebar, click on Calendar
Click the + Add Event button
Select General Event
Add the appropriate event Title
Select the Repeating Event checkbox (A Repeating Event cannot be associated with a Listing, Client, or Transaction)
Select the repeat interval (examples below):
- 1 Day(s): every day
- 2 Day(s): every 2nd day
- 1 Week(s), MON: every Monday
- 2 Week(s), MON, FRI: every 2nd week on Monday and Friday
Select the end condition:
- Never: The repeating event never ends
- After X Occurrence(s): The repeating event ends after the specified number of instances
- On (date): The repeating event ends after the specified date
Click Save
Each instance of your event should now be appearing on your calendar.
Editing a Repeating Event Instance
There may be a scenario in which you wish to edit a particular instance of a repeating event. For example, you may wish to extend this week's team meeting by 30 minutes or cancel next month's statistics review.
- In the sidebar, click on Calendar
- Select the Repeating Event instance you wish to edit
- When prompted asking whether you wish to edit the event instance or the underlying series, select Edit this event only
- Edit the event
- Click Save
Editing the Underlying Repeating Event Series
There may be a scenario in which you wish to edit the underlying repeating event itself (and thus all instances are affected). For example, the team's weekly sync meeting is being moved from 9am to 930am moving forward.
- In the sidebar, click on Calendar
- Select the Repeating Event instance you wish to edit
- When prompted asking whether you wish to edit the event instance or the underlying repeating event, select Edit all events
- Edit the event
- Click Save
If the time / frequency of the Repeating Event is changed, previously edited repeating instances may be reset as they are no longer applicable.